Smartphones have become an important part of our lives and we try to execute all our tasks on smartphones. That’s where mobile apps are essential. Today, we will talk about Building an E-Commerce Mobile App with React Native.
Most of the tasks like shopping, booking cabs, exploring outlets, ordering food, etc are all performed by us using smartphones.
You might be thinking that getting a mobile application built is a tedious and costly task. But with the help of the react native developers for hire, you can easily build your hybrid app in less time and you can easily maintain it.
In this article, we would explore how we can build a simple e-commerce mobile application using React Native.
What is React Native?
React Native is a popular framework, which was designed by Facebook, to build mobile applications. Earlier, frameworks used to have a WebView based design but React Native is primarily built using Native capabilities of the mobile.
And the best thing is mobile applications built using React Native are platform agnostic which means the same application can be installed on Android as well as iOS. This saves time, money, and allows you to have zero code duplication.
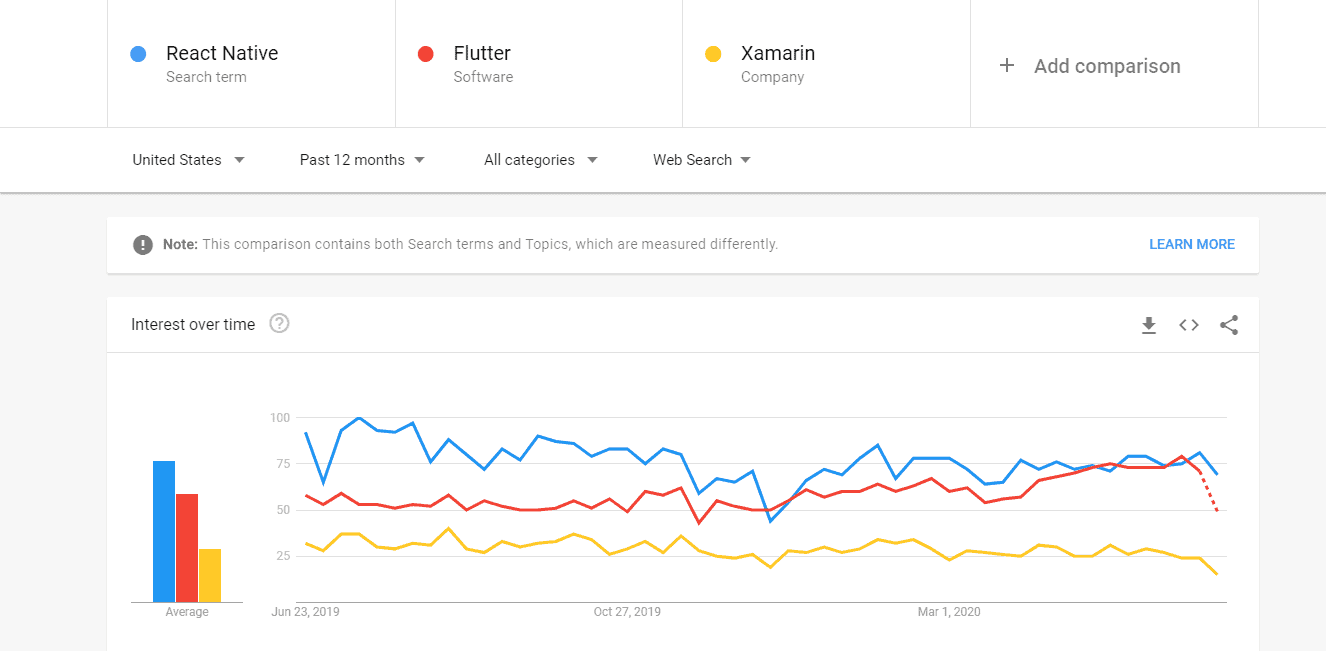
As you can see in the below image, React Native is most searched among other frameworks like Flutter and Xamarin.
Why Choose React Native For E-Commerce Mobile Apps?
React Native offers all the functionality which is needed to build an e-commerce mobile application.
It offers various React Native Component Libraries that you can bundle in your application and the corresponding functionality will be taken care of.
That’s why Building an E-Commerce Mobile App with React Native can be highly beneficial.
Benefits of React Native
- Optimal performance
- Reusable code
- Modular design
- Simple one-page architecture
- Allows you to deploy your application with zero downtime
- Various third libraries can be easily integrated
React Native is open-source and has a very active community. So, if you are stuck on a problem, you can always ask for help from the community and you should be getting quick answers.
Basic Concept of React Native App
Before we start building our application, we need to understand the basic concepts of React native and things typically work in it. It will help you to understand the React Native E-Commerce Mobile App.
Any React Native application typically executes all its codes on two threads:
Main Thread
All the user interactions such as touch and gestures are typically handled by the main thread. Also, all the native operations where you execute native code is performed on the main thread.
You should never write time-consuming code in this thread otherwise your application will start lagging.
JavaScript Thread

JavaScript thread typically executes all the JavaScript code using JavaScript engine. You typically configure which views will be displayed and the order in which those views should get executed.
For your application to run, you need both these threads to communicate among themselves. This communication is done using the bridge.
The operations are typically asynchronous. It allows JavaScript code to interact with the native code written in Android or iOS.
Now that we have learned some basic concepts, let’s start to build our application.
Creating an E-Commerce Mobile App With React Native
Prerequisites
You need to install a few packages like npm and node to build an application. It is the most fundamental aspect of building a React Native E-Commerce Mobile App.
If you are mac user install them using the command :
$brew update

$ brew install node
If you are Windows users, you can install node and NPM by downloading the installer from https://nodejs.org/en/download/ and then installing it in your local system.
We will also use expo-cli at a later point in time, so you also need to install it. You can also install it using below command:
$npm install -g expo-cli
Setting Up
If you are building a native application, then you will need an Android studio for android applications and XCode for iOS applications.
But you can also export cli to quickly create React Native applications. It can help you create projects at a glance and set them up instantly.
You can explore React Native Open Source Projects to verify this fact. It will help you to understand this thing in a better way.
You will also need to install the Expo client on the mobile on which you will test your application. And an important point, you should connect the mobile to the same network on which the computer is connected.
Creating A New Project
You can easily create a project using the expo cli. You just need to execute the below commands:
expo init EcommerceApp

cd EcommerceApp
The first command creates a project. In the next command, we will enter in the project root directory.
Installing Required Packages
Once your project is created, the next step we need to do is to install the required packages. We will install two react-native packages:
- React-native-elements:It is used to bring basic UI elements like buttons and controls.
- React-native-navigation: It is used to allow you to switch between the views.
yarn add react-native-elements

yarn add react-navigation
Once both the packages are installed, you can simply start the application by executing below command:
$npm start
Once you execute the above command, it will install the new application on the mobile.
How will the flow work?

The above image explains how the flow of code will be present. Initially, the application will load, which will load the products page.
Users can also navigate to the product details page after selecting the specific product. They also have an option to switch back to the main page where all the products are being listed.
Developing A Stack Navigator
As we have seen in the above workflow, the user can switch among the product and the product details page. So, we need to build a stack navigator. So let’s create an src folder in the project.
Once you have created a folder, let’s add the below code in it.
import { createStackNavigator } from 'react-navigation';

import HomeScreen from './views/Home';

import DetailsScreen from './views/Details';

const AppNavigator = createStackNavigator(

    {

        Home: {

            screen: HomeScreen,

            navigationOptions: { title: 'Home' }

        },

        Details: {

            screen: DetailsScreen,

            navigationOptions: { title: 'Details' }

        }

    },

    {

        initialRouteName: "Home"

    }

);

export default AppNavigator;
As you can see, we have provided routes in the file. There are two screens which we have specified Home screen and Details screen. We have set the intialRouteName to be home, so that whenever the application loads, we start with the home screen.
But wait, we have still not defined the Home screen and Details screen. Let’s add the below code to create these screens.
// src/views/Home.js

import React from 'react';

import { View, Text } from 'react-native';

class HomeScreen extends React.Component {

    render() {

      return (

            Home

      );

    }

}

export default HomeScreen;

// src/views/Details.js

import React from 'react';

import { View, Text } from 'react-native';

class DetailsScreen extends React.Component {

    render() {

      return (

            Details

      );

    }

}

export default DetailsScreen;
So, as you can see in the above code, we define two files each one for the home screen and details screen. We use react-native’s View and a Text component.
The next steps would be to make changes in app.js so that it is aware of the new stack navigator and the screens we created. So, delete the code in app.js and add the below code.
import { createAppContainer } from 'react-navigation';

import AppNavigator from './src/AppNavigator';

export default createAppContainer(AppNavigator);
Now when you execute npm start command, it will compile your code and reinstall the application on your device. You should see the below screen once you open the application.
Now once we have the basic screen and before we go ahead with more images and data, let’s finish the navigation part. So, for that, we will add a button on the Home screen.
We would just add the functionality that when the button is clicked, we navigate to the details page.
// src/views/Home.js

import React from 'react';

import { View, Text, Button } from 'react-native';

import { withNavigation } from 'react-navigation';

class HomeScreen extends React.Component {

    render() {

      return (

        <View>

            <Text>Home</Text>

            <Button

                onPress={() => this.props.navigation.navigate('Details')}

                title="Open details page"

            />

        </View>

      );

    }

}

export default withNavigation(HomeScreen);
So, as we can see in the Home screen render function, we have added a button and implemented the onPress lambda function. Inside the function, we have just added the navigation part, which will navigate to the Details screens.
With this, we have created a very basic hybrid mobile application development with React Native which has two screens and we have added the navigation functionality to go from one screen to another.
Introducing Flexbox
Flexbox was added by reacting so that your application can render consistent experience on different screen sizes. You can write a layout using CSS3 and divide space into rows and columns to achieve the right layout.
Add this section of code in the home.js file. As you can see we are creating a style and defining layout in that style. Once we have created the style, we apply this style to the View in the render function.
// src/views/Home.js

import React from 'react';

import { View, Text, StyleSheet } from 'react-native';

import { withNavigation } from 'react-navigation';

class HomeScreen extends React.Component {

    render() {

      return (

              Product here

      );

    }

}

const styles = StyleSheet.create({

  row: {

      flex: 1,

      flexDirection: 'row',

      justifyContent: 'center',

  },

  col: {

      flex: 1,

  },

});

export default withNavigation(HomeScreen);
React Native Elements
React native elements are completely built-in JavaScript by the open-source community. They are highly customizable and support various components like Button, Card, Divider, Header, and Icon.
We are going to create our component called Product. The component Product is based on Card. Let’s create a new file called product.js add the below code to Product.js.
// src/components/Product.js

import React from 'react';

import { Text, StyleSheet } from 'react-native';

import { Card, Button } from 'react-native-elements';

import { withNavigation } from 'react-navigation';

class Product extends React.Component {

    render() {

      return (

        <Card

            image={{uri: 'https://i-verve.com/blog/wp-content/uploads/2019/06/timberland-shoes.jpg'}}>

            <Text style={{marginBottom: 10, marginTop: 20 }} h2>

                Timberland shoes

            </Text>

            <Text style={styles.price} h4>

                $ 450

            </Text>

            <Text h6 style={styles.description}>

                added 1d ago

            </Text>

            <Button

            type="clear"

            title='Buy now'

            onPress={() => this.props.navigation.navigate('Details')} />

        </Card>

      );

    }

}

const styles = StyleSheet.create({

    name: {

        color: '#5a647d',

        fontWeight: 'bold',

        fontSize: 30

    },

    price: {

        fontWeight: 'bold',

        marginBottom: 10

    },

    description: {

        fontSize: 10,

        color: '#c1c4cd'

    }

});

export default withNavigation(Product);
As you can see in the above code, the Card element is added to the render function. In the card, we have added an image, text describing the product, and a buy button. Also, on the click of the buy button, we are navigating to the details button.
The next task we have is to add this newly created component to our home screen. Add the below code in the home.js to add the component. As you can see we have added the product component.
// src/views/Home.js

import React from 'react';

import { View, StyleSheet } from 'react-native';

import { withNavigation } from 'react-navigation';

import Product from '../components/Product';

class HomeScreen extends React.Component {

    render() {

      return (

      );

    }

}

const styles = StyleSheet.create({

  row: {

      flex: 1,

      flexDirection: 'row',

      justifyContent: 'center',

  },

  col: {

      flex: 1,

  },

});

export default withNavigation(HomeScreen);
Now when you run npm start, you should see the below output. As you can see we have added one product to our home screen.
We can also add more products to our home screen by adding an array of products. In the below code we have created an array of products by specifying their name, price, and image link.
// src/views/Home.js

import React from 'react';

import { View, StyleSheet, ScrollView } from 'react-native';

import { withNavigation } from 'react-navigation';

import Product from '../components/Product';

const BASE_URL = 'https://raw.githubusercontent.com/sdras/sample-vue-shop/master/dist';

const products = [

  {

    name: 'Nike Shoes',

    price: 449.99,

    img: `${BASE_URL}/1.png`

  },

  {

    name: 'Shoes 2',

    price: 389.99,

    img: `${BASE_URL}/2.png`

  },

  {

    name: 'Shoes 3',

    price: 249.99,

    img: `${BASE_URL}/3.png`

  },

  {

    name: 'Shoes 4',

    price: 185.99,

    img: `${BASE_URL}/4.png`

  },

];

class HomeScreen extends React.Component {

    render() {

      return (

          {

            products.map((product, index) => {

              return(

              )

            })

          }

      );

    }

}

const styles = StyleSheet.create({

  row: {

      flex: 1,

      flexDirection: 'row',

      justifyContent: 'center',

  },

  col: {

      flex: 1,

  },

});

export default withNavigation(HomeScreen);
Once you run the below code, you get the following output.
You need to change the Product.js to display product data. Add the below code to make those changes.
// src/components/Product.js

import React from 'react';

import { Text, StyleSheet } from 'react-native';

import { Card, Button } from 'react-native-elements';

import { withNavigation } from 'react-navigation';

class Product extends React.Component {

    render() {

      return (

        <Card

            image={{uri: this.props.product.img}}>

            <Text style={{marginBottom: 10, marginTop: 20 }} h2>

                {this.props.product.name}

            </Text>

            <Text style={styles.price} h4>

                {this.props.product.price}

            </Text>

            <Text h6 style={styles.description}>

                added 1d ago

            </Text>

            <Button

            type="clear"

            title='Buy now'

            onPress={() => this.props.navigation.navigate('Details')} />

        </Card>

      );

    }

}

const styles = StyleSheet.create({

    name: {

        color: '#5a647d',

        fontWeight: 'bold',

        fontSize: 30

    },

    price: {

        fontWeight: 'bold',

        marginBottom: 10

    },

    description: {

        fontSize: 10,

        color: '#c1c4cd'

    }

});

export default withNavigation(Product);
So, with this, you might have got a feeling about how easy it is to create an e-Commerce app to React Native. So hopefully, you should be able to proceed further and add all the functionality.
Parsing the Data
Now as we have added multiple pages in the React native application, we will have to pass data from one page to another.
// src/components/Product.js

...

<Button

  type="clear"

  title='Buy now'

  onPress={() => this.props.navigation.navigate('Details')} />
In React Native we use props to pass the data among the views as well as functions. As you can see from the below code that we are passing product name, product price, and product img using the props.
// src/components/Product.js

...

<Button

  type="clear"

  title='Buy now'

  onPress={() => this.props.navigation.navigate('Details', {

    name: this.props.product.name,

    price: this.props.product.price,

    img: this.props.product.img

  })} />

...
Few Things to Try with E-Commerce Mobile App
Now that we have learned the basics of building an e-commerce mobile app with React Native, we should try a few things like adding a cart to the app, setting up user authentication, and making the UI look aesthetic. Let’s discuss each step in detail.
Adding Cart to the App
The first step in the building cart is to add the Cart section where you can see all the products listed in the cart.
<section className="Content" id="Cart" on Click={this.releaseScroll}>

              <div ClassName="TraspBackground"></div>

              <ShoppingCart items={this.state.cart} lockScroll={this.lockScroll} notMobile=

           {this.state.notMobile} checkout={this.checkout}/>

</section>
The next step we need to do is define the React Native Shopping Cart View, which will list all the products. We explicitly check initially if the length of items in Cart is empty, we add “Nothing in Cart”.
// Create a Stateless component to display the shopping cart items

export const ShoppingCart = (props) => {

   //  If the shopping cart has no items, let the users know its empty

if (props.items.length == 0) {

  return (

    <div className = "EmptyCart">

         <Header notMobile={props.NotMobile}/>

        Nothing In Cart

      </div>)

   } else

      return (

      <div className="shoppingCart" id ="shoppingCartScroll" onClick={(e) => props.lockScroll()}>

           <Header notMobile={props.NotMobile}/>

            <ProductDisplay items={props.items} checkout={props.checkout}/>

     </div>)

   ;

}
Next, we add the callbacks and images to each of the items present in the cart.
// Go through each cart item send to cart to display

cartList = this.props.items.maps((currImg, Index)=>

          <Display image={currImg} index={index} key={index} productCallback={this.productCallback}/>

)
Once the list is added, we need to send it to the checkout page.
// Creating Initial Product Array

componentDidMount = aysnc () => {

   let productList = [];

   await this.props.items.map((currImg, Index) =>

    productList.push((currImg, order: {size: Size[0], type: Type[0], quantity:1}})

  )

 this.setState({products.productsList})

}
The final step is to build a Display component that will allow users to change the quantity, add or delete the product present in the cart.
// Render Individual Items

render() {

 return (

    <div key={this.props.index} className="CartItem">

      <figure><img src={this.props.image.src} alt={this.props.image.name} id={this.props.index} /></figure>

                    <form>

                             <table className=ContentInformation"><tbody>

                              <tr>

                          <td><b>Image Description: </b></td>

                          <td>{this.props.image.description}</td>

                          </tr>

                          <tr>

                          <td><b>Size:</b></td>

                          <td><SizeSelector sizeCallBack={this.sizeCallBack} /></td>

                          </tr>
Also, since we added Callback earlier, we need to define the callback. We can define productCallback using the below code.
// Updates products upon any change

productCallBack = async (order, index) => {

 let updatedProducts = this.state.products;

 const currImg = updatedProducts[index].currImg;

 updatedProducts[index] = {currImg, order};

 await.this.setState({products:updatedProducts});

}
Authenticating the Users Connecting to the Application
The next important and most needed functionality is to add Authentication to React Native mobile applications. You should be able to identify users and create personas for them so that you can deliver products to them efficiently.
In the code below we have created a simple sign page, which will ask for username and password and call the API to verify if the credentials passed are correct or not.
import React, {Component} from 'react';

import {

  Text,

  View,

  Button,TextInput,

  TouchableOpacity,

} from 'react-native';

var baseURL = "http://www.xyzwebsite.com/";

class Signin extends Component {

   constructor(props) {

    super(props);

    this.state = {

      email  : '',

      password: '',

    }

  }

  onClickListener(){

    let postData = {

      emailId: this.state.email,

      password: this.state.password,

    };

      this.axios

        .post(baseURL + "/SignIn", postData,{

            headers: {

              'Content-Type': 'application/json',

            }

          })

        .then(response => {

          console.log("#Api Response ", response);

          alert(response.message);

          resolve(response.data)

        })

        .catch(error => {

          reject(error)

        })

  }

  render() {

    return (


                 this.refs['password'].focus()}

                 onChangeText={(email) => this.setState({email})}/>

                 this.setState({password})}/>

               this.onClickListener()}>

                Login

    );

  }

}

module.exports=Signin;
Applying aesthetics to the UI
The first impression is very important. When the user first opens the application, your UI should be eye-catchy. It is generally observed if the user impressed with the UI, your application will have high chances to succeed.
React Native provides multiple components which you can directly use, and you would inherit the UI of those components. So, it would be a good idea to search for a component before actually implementing it.
Building E-Commerce Mobile App with React Native E-commerce Starter
Native Base has come up with a starter project which you can directly use to start building your e-commerce application in React Native. This is an important aspect of React Native E-Commerce Mobile App. So, take a note of that.
What Is React Native E-commerce Starter?
React native e-commerce starter allows us to create a project which has various built-in layouts which are ideal to build an application on fashion, electronics, & similar other items. It provides various layouts that are eye-catchy, clean, and stylish.
Another advantage is you can use the same layout on both iOS and Android platforms. These are well-structured layouts and built with an idea to provide simple and elegant UI to the users.
Following layouts are provided in the starter kit:
- Login/Sign Up
- Track Order
- Shopping Cart
- Credit Card form
- Product List View
- Social Buttons
- User Profile
Why use React Native E-Commerce Starter?
You can use the React Native E-Commerce starter kit to quickly build the application. Below are the benefits of using the starter kit.
- It has a single JavaScript codebase for both iOS & Android.
- It bundles a large set of UI Elements.
- You can easily customize the widgets.
- Most of the functionality is in-built.
- You can easily navigate from one View to another View.
Understanding React Native E-Commerce Starter
The React Native E-Commerce Starter starts with a basic Login/ Sign Up screen. Remember one thing, the starter kit only provides the UI, you need to write the backend code for all the core logic.
Also, it provides you with a Home page where you can list your products and there is also a search option. You can also list down offers on this page.
It provides you “shop with category” options where the user can filter the products based on categories like fashion or electronics.
It also provides you with “my account page”, where the user can see all the details like his name, his photo, his email-id and he can change his password from that place.
You can use the track order page to show users his current orders and the status of these orders. Users can also add products to the wish list and it has a built-in template for Wishlist components also.
It has a notifications tab also where you can send you recently added products or you can notify users of the available offers.
Attributes That Makes React Native E-Commerce Starter
React Native E-Commerce Starter uses below packages internally to provide you with the e-commerce templates:
- React
- React Native
- NativeBase
- Moment
- React Native CodePush
- React Native Button
- React Native Vector Icons
- React Native Modal box
- React Native Easy grid
- Redux
Conclusion
In today’s world, when humans attached to smartphones, it becomes necessary to provide the applications which they can use to shop on your website.
In this article, we have seen how easily we can build an application from scratch using React Native.
You can easily add views to display your product and stack navigators to move from one View to another. Many functionalities can be easily added as various packages are available.
We have also explored how we can use React Native E-Commerce Starter Kit to build an e-commerce application.
We hope you had a great experience reading this article and it will be of great benefit for any developer. Thank You.!
-
Why React Native Is A Great Choice For E-Commerce Apps?
There are some reasons which make React Native a great choice for E-Commerce apps. They are as follows:
Cross-Platform Compatibility
Native Features
Real-Time Updates
Great Developer Experience
Futuristic Technology -
What Is The Role Of Flexbox In React Native?
The main purpose of Flexbox is to provide a consistent user experience across different screen sizes. So, it plays a part in responsive design.
-
How To Make React Native App Responsive?
There is a package called react-native-normalize which will help you to make your design responsive in a quick manner.
-
What Is The Role Of React Native Elements?
React Native Elements are a set of reusable components that you can use right through the React Native app. It helps to reduce development time.
-
How Does React Native Work Internally?
React Native works by spinning up a JavaScript thread with which you can interpret the JS code. It also communicates with the native components.


