Earlier HTML was extensively used to build the front-end, but HTML is only good when it comes to static content. AngularJS is one such powerful JavaScript framework that you can use to design your front end. Today, we will talk about creating an Angular Library in detail.
AngularJS is open-source and can be used for free. You can also write your library in AngularJS or hire dedicated angular developers to get better results. It provides you the flexibility to write your code in proper MVC architecture.
Another benefit is that it is cross-browser compliant. It is much more responsive which provides you with a dynamic user experience.
Key Things For Creating An Angular Library
Sometimes when you use a third-party AngularJS library, you might want to extend it. You can extend this library by creating your library.
In case you want some custom components, you can also create an Angular Library. These are some of the Benefit Of AngularJS. In this article, we will discuss how to create an Angular Library.
Getting Started
The first step in building your custom library is to install angular CLI. You can install angular CLI using the command ‘npm i -g angular-cli’.
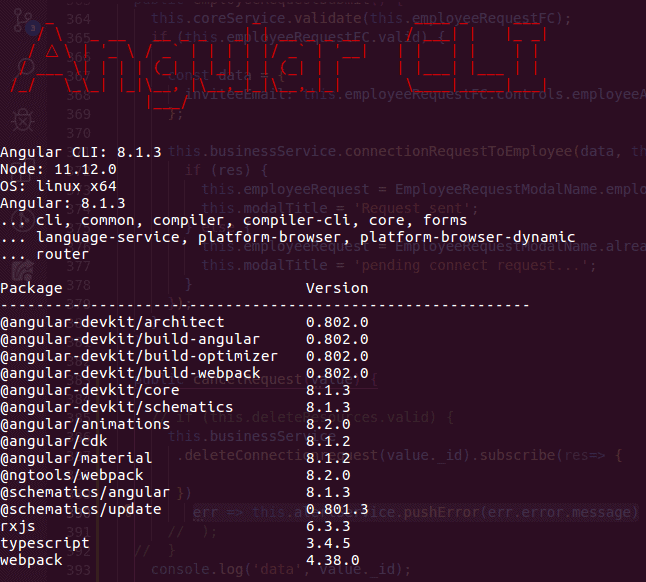
Once you have installed the Angular CLI. You can verify the installation using the command ‘ng version’. The expected output is shown below.
Introduction To Angular CLI
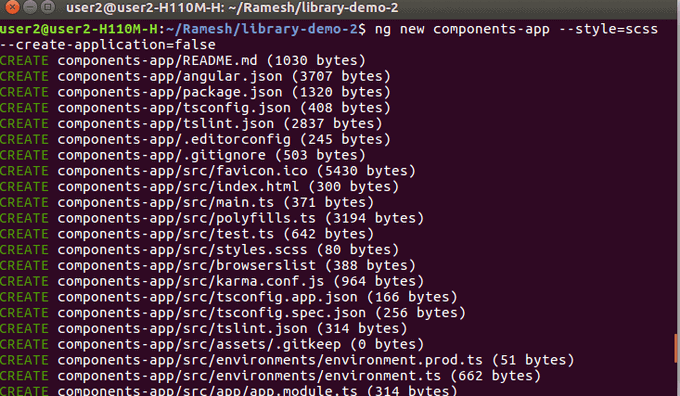
Now that we have installed the Angular CLI, the next step is to create a workspace. You can create a workspace using the below command “ng new <workspace-name>”.
This command generates two projects, Angular Library, and Angular Application.
- Angular Library: This is the project in which you will add your library code. You will publish this code to the npm repository.
- Angular Application: This is provided by Angular CLI so that you can test your library by integrating it into this application.
Understanding the Process
Before we dive into creating the Angular Component Libraries and understanding the components, let us outline the process and steps that we are going to follow.
- The first step would be to create an application. You can name it as per your needs. I am naming it as “AngularComponentsApp”
- We are going to use this “AngularComponentsApp” to test our library “AngularComponentsLibrary”.
- The next step would be to create “AngularComponentsLibrary” using the command “ng g library AngularComponentsLibrary”
- We can identify the library since it would be having a prefix of UIC.
- The next step would be to import our newly created “AngularComponentsLibrary” to our newly created application “AngularComponentsApp” so that we can test our library.
- Once we have tested our library, we can import it into our actual project and use it.
Create an Angular Library
Let us go ahead and create our Angular Libraries. For that lets us create a workspace and then add a library in it.
You can create the workspace using the below command.
ng new components-app --style=scss --create-application=false

cd components-app

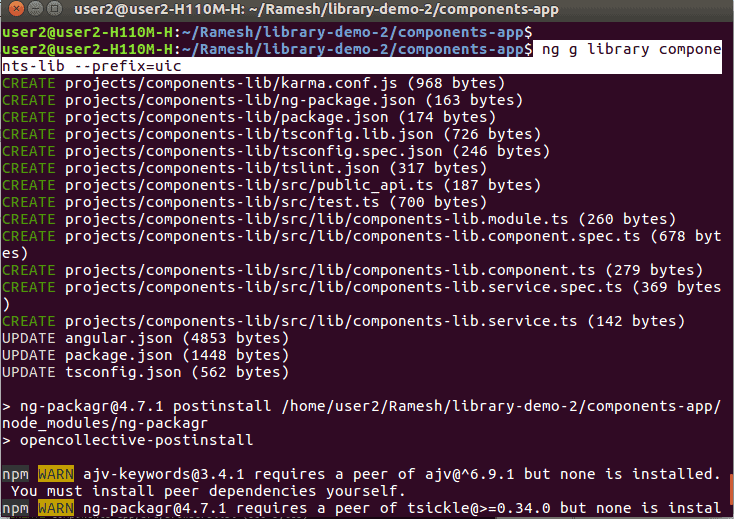
ng g library components-lib --prefix=uic
Here, we have made use of the -prefix to make our library components unique from others. If we do not use the -prefix flag, then Angular CLI will take lib by default.
Now let us see what the generated library command can do:
- Will add a new `components-lib` project in the angular.json file.
- Add `ng-packagr` dependencies to our package.json.
- Will add a reference to the `components-lib` build path in tsconfig.json.
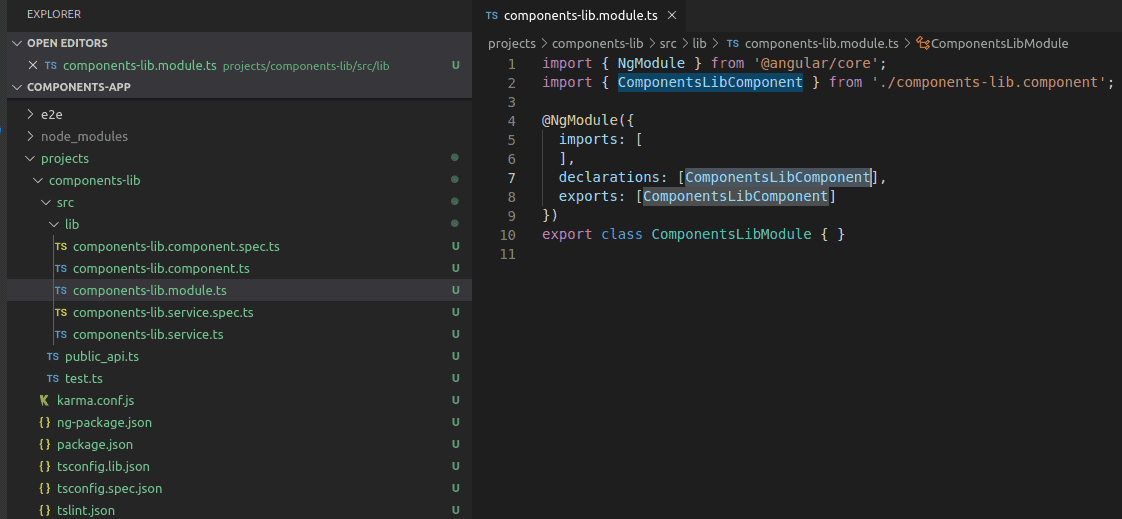
- Create sources for our library in the `projects/components-lib` folder.
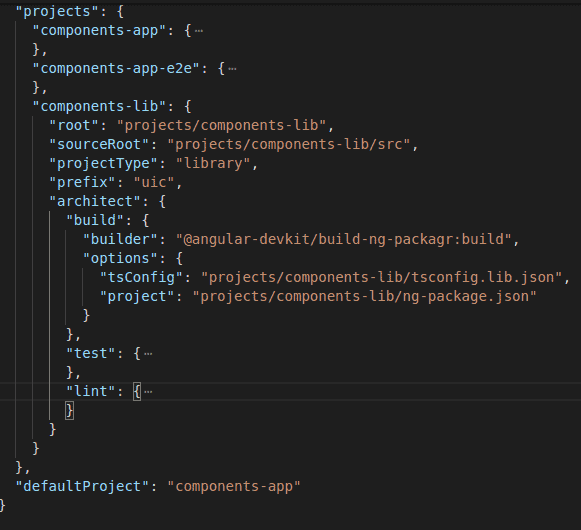
Looking At Updated angular.json File
It is important to understand the key features of the angular.json file. For that purpose, knowing the Features of Angular 10 is also vital.
- Root: In the “AngularComponentsLibrary” Node in the JSON, we have the root, which specifies the exact location of the source code of our library.
- project-type: This specifies our project-type. For the “AngularComponentsLibrary” node, the value of the project-type is “library”.
- Prefix: Remember when we created the project, we gave the prefix as UIC. In case you forget the prefix, you can always see it in the angular.json file
Dependency of ng-packagr
Ng-packagr is a node-based library which can help you to package the Typescript code base to Angular Codebase. You can install it using “npm install ng-packagr –save-dev”
It adds two files to your project: ng-package.json and public-api.ts
Understand ‘components-lib’ Library Sources
Let us understand a few basic files which are present in the AngularComponentsLibrary folder.
public_api.ts
This is the entry point for our Angular Libraries. We can specify which all parts of our library are visible externally.
package.json
When we bundle the library, we also add the package.json file. This file specifies the dependent packages which our library requires.
When the developer adds our library, all the packages mentioned in package.json are also installed.
The next step would be to export the Angular Libraries module in the public-api.ts file. After which we will import this file in our application so that we can test the code.
ng-package.json
The configuration file of ng-packagr.
How To Build Our Library?
We can build our library using the command:
ng build components-lib

It builds our library to the folder:

components-appdistcomponents-lib
The output of the build is generated in the “AngularComponents/dist/angular-components-library”.
Testing Library in Application
Now that we have created our Angular Libraries and compiled them, lets us add the library in the application and test the code. We will import our angular-components-library into our application.
Import Library Module into the Application Module
Let us first find out the default Angular Component Library that has been created. We can go to project/dist/angular-components-library/lib/ angular-components-library-module.d.ts file.
Our component name is AngularComponentsLibraryComponent.
The next step would be to import this component in our application. You can go to src/app/app.module.ts and add the component.
Also remember, we need to make this publicly available from our library. So, we need to add this to our public_api.ts file. You can add the following line of code in your public_api.ts file.
export * from ‘./lib/ angular-components-library.module’;
Displaying the ‘components-lib’ Component
With this step, we are almost done with our integration. The next step would be to add the generated module of the library in our application.
You can add the below code in app.component.html. This is our application’s main component.
Run an Application
Now that we have integrated the library with our application, the next step would be to test our code. You can run the command “ng serve” command.
If the command executes successfully, your library is integrated. On the browser, you should be seeing this window.
How to Write an Angular Library for Angular 6?
We will also discuss another method for building the Angular library. This method is very useful if you are running on an Angular version less than 6, since “ng generate library” was added in later phases.
In this method, we are going to use source code directly to generate the library. There are a few pitfalls to this method, but it is very good when it comes to intra organization distribution.
Let’s say you have a monolith repo and you want to break it into packages, you might want to try this method.
One major pitfall of this method is the fact that all the consumers of the library should be on the same typescript version as the library.
Let us say, the library was compiled with Typescript 2.8, you cannot integrate it with an application which is running on Typescript 2.7. This makes the library non-distributable.
Another major issue with this method of library generation: you have to compile the complete library code if you want to make changes.
We are typically habituated to change and hot reload, but that would not be possible if you make changes in the library.
Let us see what all steps are required to build a library.
Step 1: Creating a new project
This step remains the same as we have seen earlier. We need to create a new workspace. This application would be the consumer of the library which we are going to build.
ng new libex-project --prefix libex
So, here we have created a project named as libex-project. We have also added the prefix so that we can identify the project.
Step 2: Creating a new module
The next step would be to create a module. Our library would be residing in a module, you need to create a module. You can create the module using the above command.
ng g module libex

cd src/app/libex/
We have created the module named libex. The next step would be to go inside the module. We can go src/app/libex using the cd command.
Step 3: Building your own library module
Once we are inside the module, we need to create our component, services, etc. You can create a component using the following command.
ng g component hello
This would create a simple component called hello. Once you are done with creating your components and services, you need to export these components. You can export them using the below code.
@NgModule({

  imports: [

    CommonModule

  ],

  declarations: [HelloComponent],

  exports: [HelloComponent]

})
As you can see, we are exporting the HelloComponent by adding them to the exports module.
The next step would be adding this Component in your application so that you can test your code. You can import your LibexModule in your AppModule.
...

imports: [

  BrowserModule,

  LibexModule

],
You can also make your library module as a singleton. The below code will help you to achieve the same.
@NgModule({

  providers: [ /* Don't add the services here */ ]

})

export class LibexModule {

  static forRoot() {

    return {

      ngModule: LibexModule,

      providers: [ SomeService ]

    }

  }

}
Also, for a singleton, you need to update your app module differently as shown below.
...

imports: [

  BrowserModule,

  LibexModule.forRoot()

],
Step 4: Setting up index.ts
You need to export all the modules which you want your consumer to access. With Angular 8 we used public_api.ts. Similarly, here also we need to specify the modules in the index.ts file.
You can use the below code to add access to all modules.
export {LibexModule} from './libex.module';

export {HelloService} from './hello.service';

export {HelloComponent} from './hello/hello.component';
As you can see, we have simply exported the components and services. There is one more advantage of exporting them: they can be easily accessed in the consumer. You can import them using the below command
import {HelloComponent} from 'lib'
Earlier, you had to use the below command to import.
import {HelloComponent} from 'libex/hello/hello.component'
Step 5: Publishing the library
Now that we have created the library, the next important step is to publish this library using the npm command.
You need to create a package.json file to publish the code. We have a very small utility that you can use to generate a package.json file.
const fsextra = require('fs-extra');

const { exec } = require('child_process');

fsextra.copy('./src/app/libex', './dist-lib', err => {

  if (err) return console.error(err);

  console.log('Copied files');

  createDeclarations();

});

function createDeclarations() {

  exec('cd dist-lib && tsc index.ts --declaration', () => {

    console.log('Generated declarations (and some JS files...)');

    createPackageJson();

  });

}

function createPackageJson() {

  const packageJSON =  {

    "name": "libex",

    "version": "2.0.0",

    "description": "How to build libraries with Angular (2, 4, 5...)",

    "main": "index.js",

    "scripts": {

      "test": "echo "Error: no test specified" && exit 1"

    },

    "repository": {

      "type": "git",

      "url": "git+https://github.com/bersling/angular-library-example"

    },

    "keywords": [

      "Angular",

      "Angular2",

      "Library",

      "Example"

    ],

    "author": "[email protected]",

    "license": "MIT",

    "bugs": {

      "url": "https://github.com/bersling/angular-library-example/issues"

    },

    "homepage": "https://github.com/bersling/angular-library-example#readme",

    "types": "index.d.ts"

  };

  fsextra.writeJson('./dist-lib/package.json', packageJSON, {spaces: 2}, err => {

    if (err) return console.error(err);

    console.log('Created package.json');

  });

}
The code is very simple to understand. Most of the code is just specifications for the package, JSON file.
- The code uses npm package fs-extras, so you will have to install the fs-extras in your project root directory.
- All the compiled code is added to the dist-lib directory.
- It also can compile the typescript code to index.d.ts file. This is particularly useful in case you are using IDE as it helps in Autocompletion.
- Post all this it generates the package.json file
The most important part of this step is generating package.json. Once this file is generated, you can simply publish the code from the dist-lib directory using the npm publish command.
In case you have added some third-party library in your library, you also need to add them to the package.json file.
One more important point to consider is versioning. Always remember to version your code correctly. Most of the version looks like x.y.z where x is a major version, y is a minor version and z is the patch number.
Few important points to note here are:
- If there are any breaking changes, publish them by incrementing the major version.
- If you are adding new features and not modifying the existing APIs, you should upgrade the minor version.
- In the case of simple bug fixes, you should be good if you can increment the patch number.
Step 6: Consuming your library
Now that we have published our library, we can consume them in two ways. One simple way would be to use the npm and download our library and integrate it with the project. NPM takes care of all these steps.
Another method is to use npm links. In your .angular.cli.json file you need to add this link.
"defaults": {

  ...

  "build": {

    "preserveSymlinks": true

  }
Also, if you are using an Angular version above 5, you need to add these extra codes in your tsconfig.jsonṁ file.
"include": [

  "src/**/*",

  “node_modules/your-library/index.ts",

]
In this way, you can easily create your library, publish, and consume it.
Read also: AngularJS vs NodeJS vs ReactJS: Which One You Should Opt For?
Build A Component Library with Angular and Storybook
Now that we have learned to build a library with all angular version using native ng g library and using source code directly, let us see how we can visualize our components using Storybook
The storybook is an open-source toolkit that can be used by developers to define, develop, and test UI components.
It was initially built for the React framework but slowly it has been extended to all the UI frameworks.
It has a very strong community with thousands of stars on GitHub repo. Another major advantage of using a storybook is its cost. It is free to use.
So, let us start by creating a component library and then using Storybook to visualize it.
Creating a workspace
As you might have understood by now, all projects in AngularJS start by creating a workspace. It is important to make sure that you have Angular CLI installed globally.
You can also install it using
npm i -g @angular/cli@7
Let us create an empty workspace now. Also, I am giving –create-application as false as I do not want to add an application.
If we set this flag as false, Angular will create an empty workspace with no project in it.
ng new ng-ui --create-application=false
Creating a Library
Now let us create a library called button. All the components in AngularJS are essentially libraries. You can execute the below command to create a library called button.
ng glib button -p ui
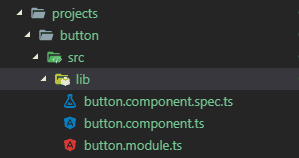
Now this will create projects/button folders that will contain our library code. It will also create service inside NgModule. You can delete it if you want as it is not needed.
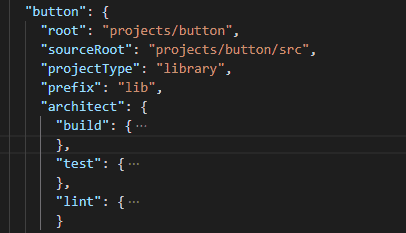
Now if you see the content of the angular.json file, it is updated with type as lib.
As you can see, the architect has three steps; to build, test, and lint. So we can use these commands to execute these steps.
ng build button
ng test button
ng lint button
Now as we have seen earlier, all the components which consumers can access need to be added in the public-api.ts file. So, let us go ahead and add our components in the public-api.ts file.
Button Component
Now that we have created a button component, let us create some UI in it. We will add two input variables, the text of the button and if the button is disabled or not.
import { Component, Input } from '@angular/core';

@Component({

  selector: 'lib-button',

  template: `

    <button [disabled]="disabled">{{text}}</button>

  `

})

export class ButtonComponent {

  @Input() text: string;

  @Input() disabled: boolean;
Once we have added the code, we can build the code using the command:
ng build button
With this our library code is ready. Let us go ahead and package this library so that we can start consuming it.
In this part, let us pack it using tarball. We can use this simple script and create a tarball pack.
"scripts": {

  ...

  "pack_button": "cd dist/button && npm pack",

  ...

}
We can then execute the command “npm run pack_button” which will generate the button-0.0.1.tgz file.
Another alternate that we have discussed earlier is to distribute the code using npm publish command also.
Setup
We can set up StoryBook easily as it provides you with a CLI tool using which you can initialize the project. There are a lot of AngularJS Development Tools can one can utilize as per the needs.
We also need to install npx as we are going to use it to start the Storybook.
npx @storybook/cli init
You can start Storybook using the above command. It will find all our projects and add them to the Storybook UI. It will add all our npm dependencies and the scripts.
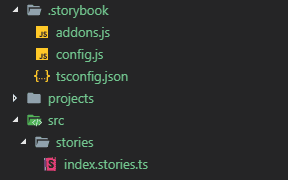
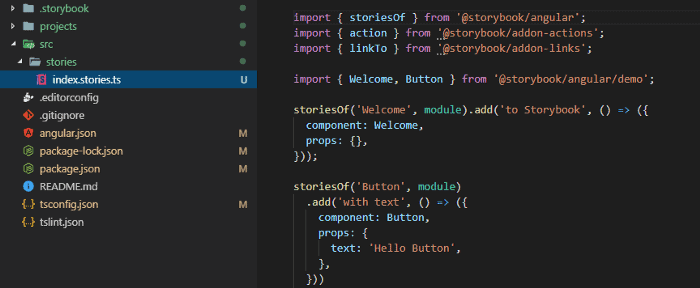
It will also create the sample stories using src/stories/index.stories.ts file. We can see that in the below image.
Also if you remember, when we created this project, we did not add the application. So since we don’t have the application, we need to change the path of TypoScript code so that it fetches files from the root directory. You can change it to tsconfig.json.
"extends": "../tsconfig.json"
Starting up the StoryBook
Now that we have downloaded all the dependencies and set up the Storybook, let us start it. You can run your storybook using the below command.
npm run storybook
It will start the storybook on port number 6066.
You can access it from the browser by visiting http://localhost:6066/link. You will see a sample storybook that was generated from our project.
You can see the generated sample story in /stories/index.stories.ts file.
Typically there are two levels to Storybook structure. The component is globally added using stories and we use Add for adding different views in it. It allows you to create as many stories as you want.
The below view shows the tree view and what happens when we click on a corresponding structure.
Integration
We can consume this library in our application by using the command npm install like as shown below:
npm i dist/button/button-0.0.1.tgz
Now when we would go and see and package.json of the application, we should see that the library is now part of dependencies.
"button": "file:dist/button/button-0.0.1.tgz"
If we had published the library, we could have also consumed it using below command:
npm integrate button
Stories
StoryBook is used to write a story that describes the visual state of the component. We can think of it as a unit case where we mix and match different component states.
Now let us go ahead and add a few stories to our button library. In the first, we will pass hello as button text and we should expect to see a button with hello written on it.
In one more story, we are going to disable the button by setting the disabled property to true.
import { storiesOf } from '@storybook/angular';

import { ButtonComponent } from 'lib-button';

storiesOf('button', module)

  .add('basic', () => ({

    component: ButtonComponent,

    props: {

      text: 'hello'

    }

  }))

  .add('disabled', () => ({

    component: ButtonComponent,

    props: {

      text: 'disabled',

      disabled: true

    }

  }));
When we run this code, we would see the below states:
You can test your components using various visualizations. You can create one story each for one of the visual possible states.
It allows you to test and play with your code without any other external dependencies in an isolated manner. It also helps in styling as designers can better visualize the component.
Conclusion
If you are building a new component, it is always good to build it as a library which can easily be consumed by a lot of developers.
In this article, we have discussed AngularJS For Web App Development allowing you to create a library natively using ng generate library command.
If you are using an earlier version of Angular, you can try to create the library directly from the source code as we have discussed in method 2.
Though it has pitfalls, it is good for breaking up the monolith code into various modules.
We have also discussed how you can integrate Storybook and visualize all your components as different stories. For any assistance, you can always connect with AngularJS Web Development Company to resolve your queries and achieve potential Angular Development Solutions.
We hope you had a great experience reading this article and it proves to be of great value in the near future. Thank You.!
-
Where Is the Path of Your Custom Angular Library Defined?
When you install a library package, the mapping is in the node_modules folder. When you build your own library, it has to be in the tsconfig path.
-
What Do You Mean By Library In Angular?
An Angular library is an Angular project is a facility that can not run its own. You need a package with the library in order to use it.
-
What Is Peer Dependency In Angular?
Peer Dependencies are used for specifying packages that are compatible with a specific version of an npm package.
-
What Is Ng In Angular CLI?
With the help of Ng command, you can create a new Angular workspace folder and it also generates a new skeleton as well.
-
What Is The Use Of Lodash In Angular?
Lodash is used for maintaining the JavaScript code in a concise manner.


