Are you looking forward to creating your own website or blog to share your content with the world and could not do it because you don’t know how to do it, and hiring developer with skills of both will cost you like a fortune? Today, we will talk about Headless WordPress Using React.
WordPress is a content management system that is open-sourced and licensed under GPLv2. You can easily create your own website, deploy it, modify and upgrade it. As a result, companies prefer to hire WordPress developer to get their website built quickly with ease.
WordPress is free of cost software that anybody can operate easily without having to learn to be tech-savvy. Companies Using React are making use of WordPress as a combo.
Steps To Implement Headless WordPress Using React
The interesting fact about WordPress is that it is highly customizable, which makes you give your website a personal touch, and it will be like your virtual second home where you can share your content or ideas.
Step 1: Setting Up A WordPress Site
For implementing React in WordPress with Headless CMS, the first step will be to set up a WordPress site as it will provide all the relevant sources to create front-end React applications .
Get started with using git for installing the zip file of the WP-Rest API plugin and then upload that zip folder within your WordPress plugins folder.
As soon as the file gets uploaded, allow the WordPress Rest API into your ReactJS WordPress website by activating the plugin.
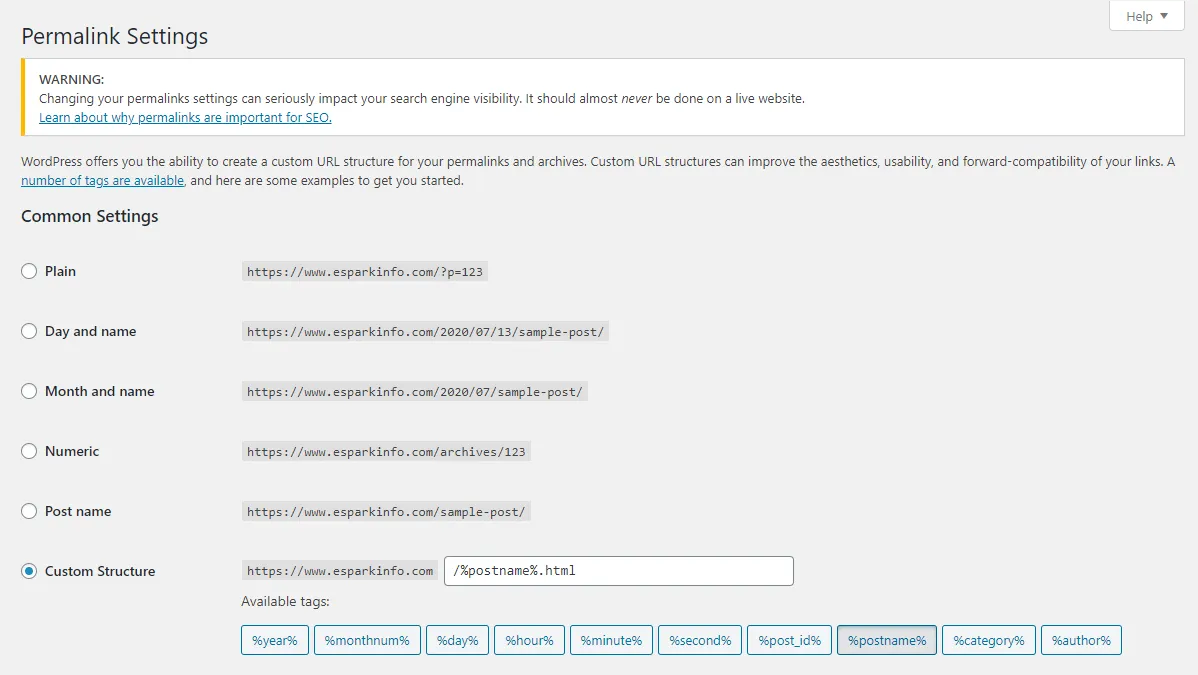
Now, head toward the Settings → Permalinks and choose either Post name or Custom Structure.
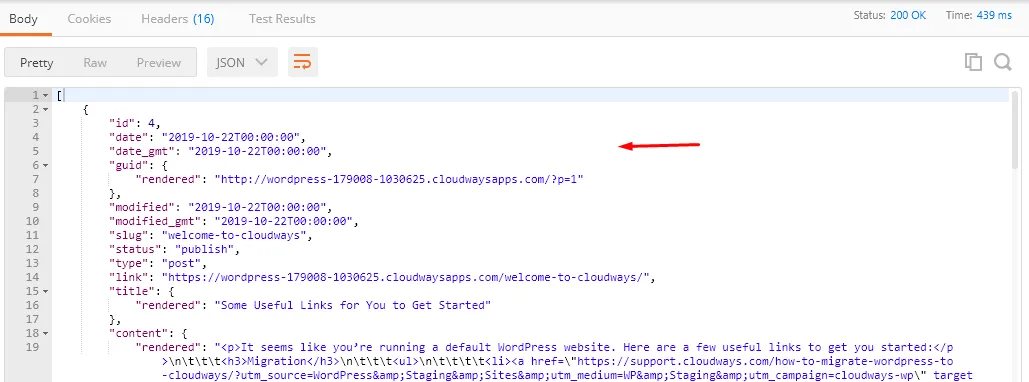
As we are functioning with API calls, therefore, install the chrome extension for Postman. When you get into the Postman then type the URL in the following manner:
https://example.com/wp-json/wp/v2/posts
This URL will help you get data into your WordPress site.
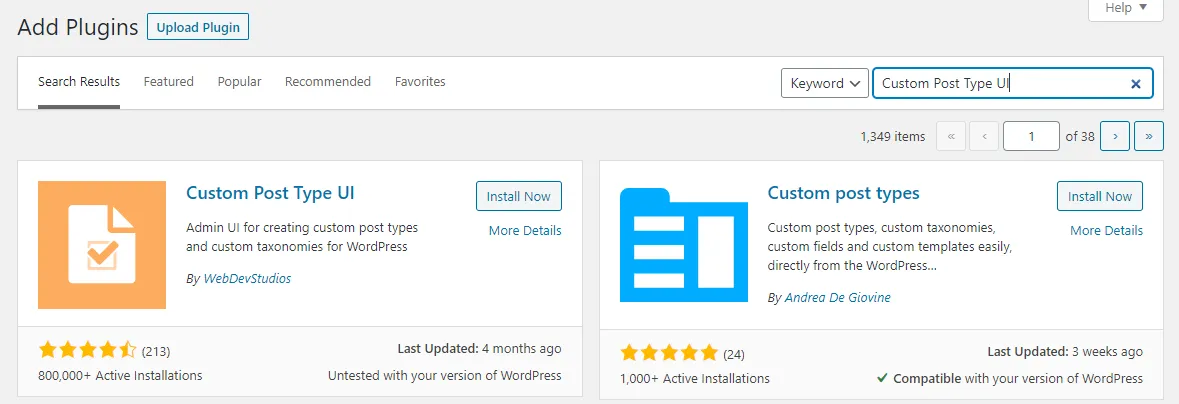
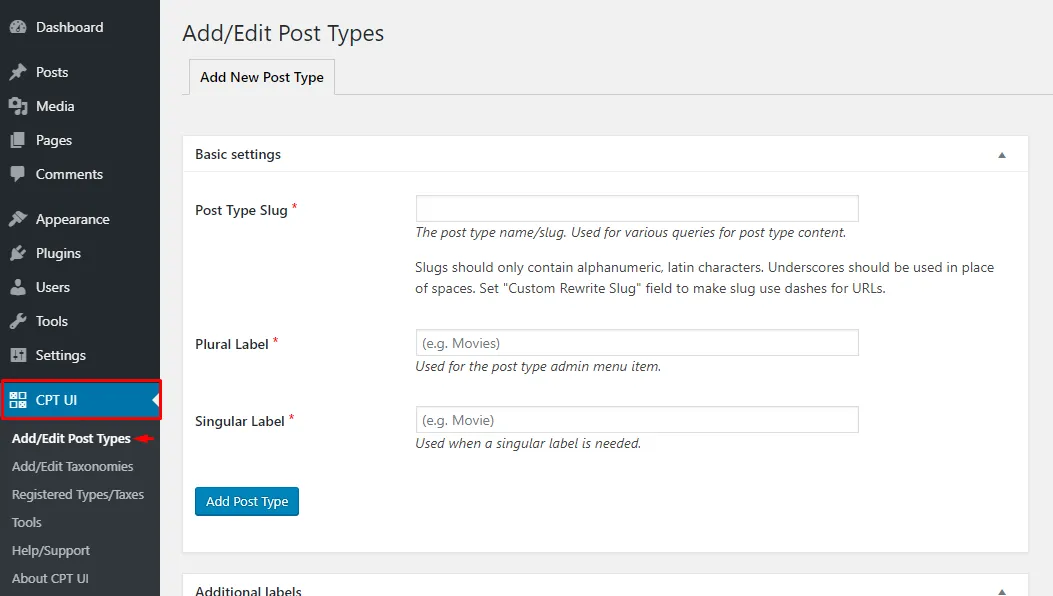
Custom Post Type UI Plugin
Copy the Custom Post Type UI plugin by downloading it to create custom post types. These posts will show up when you will make use of WordPress with React in the next step.
Now, Install and activate the plugin and start adding a new post type. To help you understand it, we will show you how to create a custom post type for Books.
First, write the name of the custom post in the Post Type Slug. If you want to use Headless WordPress, make sure to set True in the Show in the REST API option.
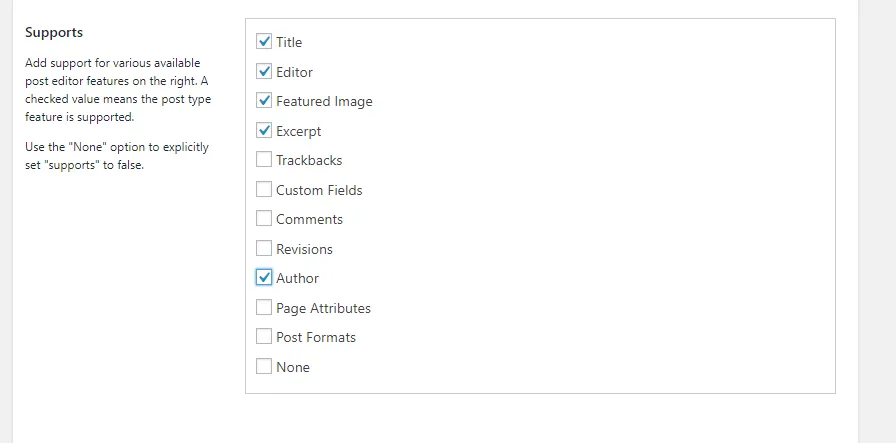
Click to all the options for getting the information you want to fetch from the REST API.
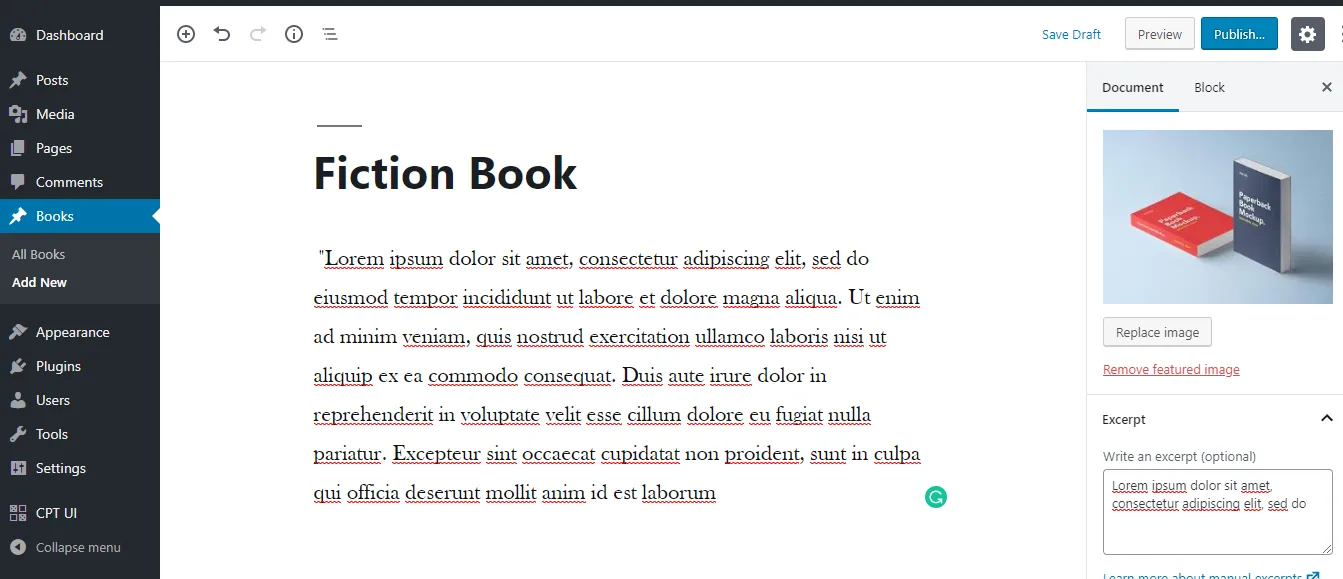
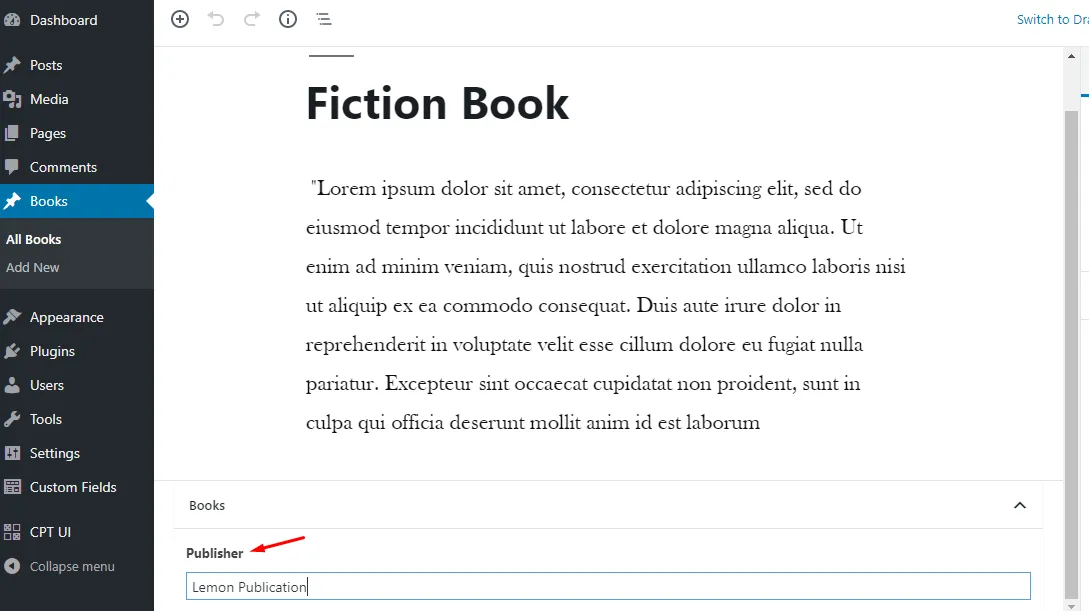
As soon as you click on save, you will come across a new option that has popped up in the sidebar—click on that option to add a new book into your custom post type.
The book is created, which you can see in the above picture where sample data has been included.
Click on the URL inside the Postman to check whether the data is available through API.
Now, the URL will show up like https://exampe.com/wp-json/wp/v2/books
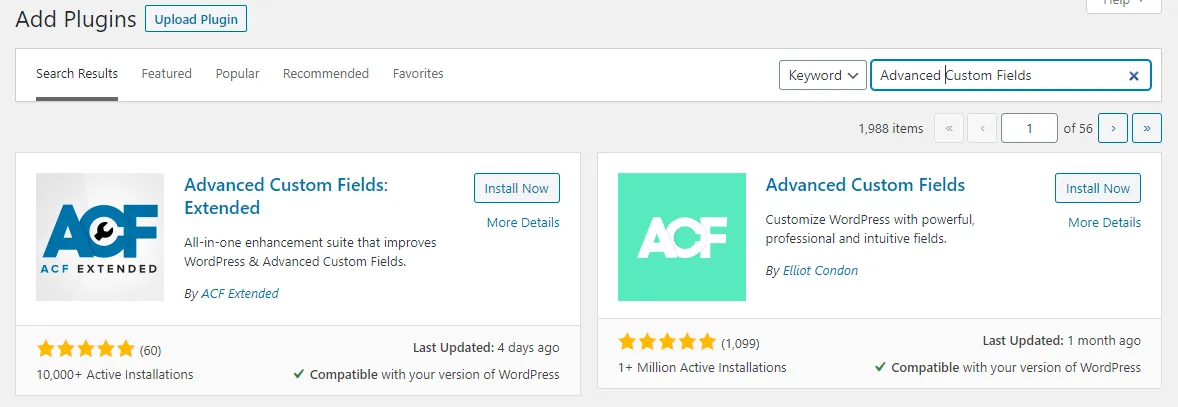
So now, you can include further fields such as Publisher by using ACF and ACF into RestAPI plugins.
Install and activate both the plugins.
Now, we have to download the ACF REST API plugin also.
Make sure to select the desired post type from the list. After that, click on ‘Publish.’
You will come across a new field inside your custom post type. That’s all that you need to set up React with WordPress for sending data to ReactJS web application.
Step 2: Getting Started With React
For setting up the React application, the following requirements are necessary to be installed on the computer.
- NodeJS & NPM.
- Text Editor such as Sublime or Visual Studio Code.
- Git for version controlling (Optional)
As soon as you install all the dependencies, Create the project with ReactJS WordPress by opening up the command line typing the following code
npx create-react-app frontend
Now, the app will be created, change the directory to the app folder, and run the following command to install the Axios package for API calls.
npm i axios
Then, click on the folder that is inside your favorite text editor.
Launch the application by running the command npm start.
Now, we are ready to create a web application with headless WordPress ReactJS.
Create a new folder ‘components’ inside the src folder, and inside the ‘components’ folder, create a new file ‘Books.js’. It’s an important part of Headless WordPress With React.
Step 3: Rendering Post Data On ReactJS
You can get the data from the WordPress Rest API from Book.js file. The code shown below will request the Rest API end-point, which in this case is ‘/books’ – and displays the data in JSON format.
import React, { Component } from 'react'

import axios from 'axios';

export class Books extends Component {

   state = {

    books: [],

    isLoaded: false

   }

 componentDidMount () {

   axios.get('https://wordpress-179008-1030625.cloudwaysapps.com//wp-json/wp/v2/books/')

    .then(res => this.setState({

        books: res.data,

        isLoaded: true

    }))

    .catch(err => console.log(err))

   }

   render() {

   console.log(this.state);

    return (

        <div>

        </div>

    )

   }

}

export default Books
The coding done above will display the series of data in the console, which is then utilized inside the render block.
Now, inside App.js file, call the Books component, as shown below.
import React from 'react';

import './App.css';

import Books from './components/Books';

function App() {

 return (

   <div className="App">

 <Books/>

   </div>

 );

}

export default App;
It is necessary to refer to the “Books” in this file because App.js is the entry point of our web application
Step 4: Displaying Post Data On ReactJS
The data can be shown by including the below code in the render method.
render() {

    const {books, isLoaded} = this.state;

    return (

        <div>

            {books.map(book =>

               <h4>{book.title.rendered}</h4>

            )}

        </div>

    );

   }
In Spite of showing data here, you can make a new component to separate it from the parent component. Name it “BookItems.js”.
Change the render method inside Bookk.js to something like:
render() {

    const {books, isLoaded} = this.state;

    return (

        <div>

            {books.map(book =>

            <BookItems key={book.id} book={book}/>

            )}

        </div>

    );

   }
Now, we need to render the BookItems component instead.
Inside the BookItems.js add the following code:
import React, { Component } from 'react'

import axios from 'axios';

import PropTypes from 'prop-types';

export class BookItems extends Component {

   render() {

    const { title } = this.props.book;

    return (

        <div>

           <h2>{title.rendered}</h2>

        </div>

    )

   }

}

export default BookItems
To get the title and other information of the book, refer to the book prop in the code.
Note: Make sure to give reference to the Book Items component inside the “Books” component.
Now, the final version of BookItems.js looks something like this:
import React, { Component } from 'react'

import PropTypes from 'prop-types';

import axios from 'axios';

export class BookItems extends Component {

   state = {

    imgUrl: '',

       author: '',

    isLoaded: false

   }

   static propTypes = {

    book: PropTypes.object.isRequired

   }

   componentDidMount () {

    const {featured_media, author} = this.props.book;

    const getImageUrl = axios.get(`https://wordpress-179008-1030625.cloudwaysapps.com//wp-json/wp/v2/media/${featured_media}`);

    const getAuthor = axios.get(`https://wordpress-179008-1030625.cloudwaysapps.com//wp-json/wp/v2/users/${author}`);

    Promise.all([getImageUrl, getAuthor]).then(res => {

        console.log(res);

        this.setState({

            imgUrl: res[0].data.media_details.sizes.full.source_url,

            author: res[1].data.name,

            isLoaded: true

        });

    });

 }

   render() {

    const { title, excerpt } = this.props.book;

    const {author, imgUrl, isLoaded} = this.state;

    return (

        <div>

              <h2>{title.rendered}</h2>

           <img src={imgUrl} alt={title.rendered}/>

              <strong>{author}</strong><br/>

           <div dangerouslySetInnerHTML={{__html: excerpt.rendered}}></div>

        </div>

    )

   }

}

export default BookItems
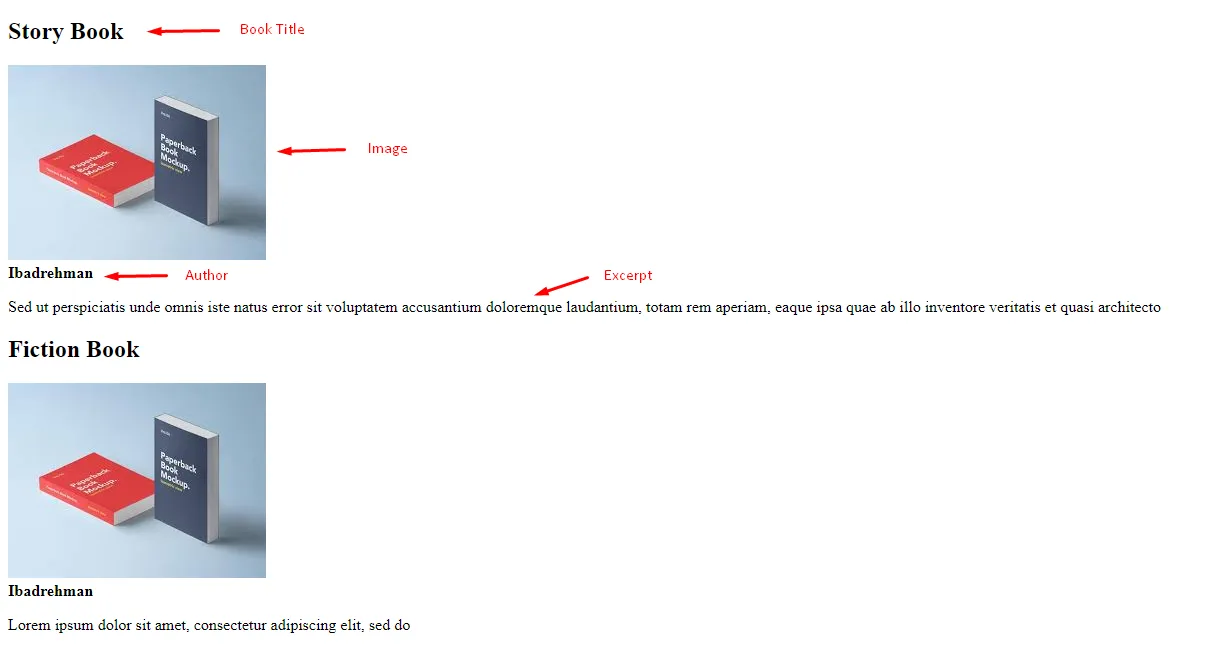
And the output in the browser won’t look that amazing because styling has not been done in this example; whereas you can modify the output by styling as per your requirement.
Headless WordPress Using React & NextJS
Step 1: Prerequisites
To get started with Headless WordPress React and NextJS, there are certain requirements to be met which are as follows:-
- To have the website which is relevant for Google, must be server-side rendered
- Like any other website, you need to be able to route pages
- Needs to be efficient and pass Google Lighthouse testing
After having the above requirements of the project, you can use WordPress as a decoupled backend CMS and React alongside Next.js to handle the front-end app, SSR, performance, and routing.
It might sound like a herculean task, but it is worth doing it. It will help you to create a better WordPress website.
Step 2: Installing WordPress
Now, the foremost thing to get started with React and WordPress is installing WordPress, which you can do either online or locally.
To be quick in this, you can also use Local by Flywheel, or else there are multiple websites to do so, such as WP Engine.
Create a different folder to get everything started systematically for WordPress and React app. There are multiple repos and frameworks floating online, which are built and configured well in advance to handle the setup conveniently by you.
To start with, create a new folder and install all the relevant things you need.
$ mkdir nextjs

$ cd nextjs

$ npm init

$ npm install --save next react react-dom axios
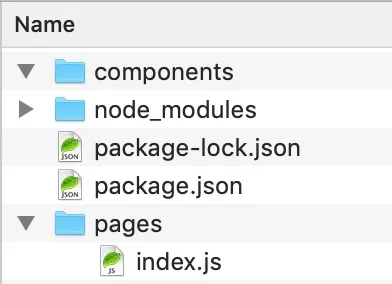
As soon as you run the command, you’ll notice a package.json, package-lock.json file, and a node_modules folder.
You can replace the test script with some simple scripts inside your package.json file to facilitate an easy start to your project and then create necessary files.
"scripts": {

 "dev": "next -p 8080",

  "build": "next build",

  "start": "next start -p 8080"

},
Step 3: Folder Structure
The folder structure is the way how the folders in your computer are organized. Let us break this into simple terms.
If anything is present in the components, it will only be treated as components. And if anything is present in pages, it will only be treated as pages. Now, let us combine these two.
The styles folder has its main function to add and compile any new Sass, LESS, CSS, or any SCSS files on the go. You can use the following code to test things out:
export default () => {

  return <h1>Your new server-side rendered React.js app!</h1>

}
Step 4: Routing
Now, let us just keep everything in the components folder. Inside your components folder, create a new file folder and let us name it Navigation.js.
Inside this file is where we set up our routes. Now let us add a new file called posts.js inside pages and add a bit of the same code to differentiate it from index.js
 export default () => {

 return

Our Posts Page!

}
This is to ensure that everything is working, and it is perfect. The final result of the Navigation.js is:
import Link from 'next/link'

export default () => (

 <ul>

     <li><Link href="/"><a href="/">Home</a></Link></li>

     <li><Link href="/posts"><a href="/posts">Posts</a></Link></li>

 </ul>

)
Now, let us do some updates. For this, you have to use the following codes:
import Navigation from '../components/Navigation'

import { Fragment } from 'react'

export default () => (

  <Fragment>

   <Navigation/>

   <h1>Your new server-side rendered React.js app!</h1>

  </Fragment>

)

&

import Navigation from '../components/Navigation'

import { Fragment } from 'react'

export default () => (

  <Fragment>

 <Navigation/>

 <h1>Our Posts Page!</h1>

  </Fragment>

)
In order to avoid unnecessary extra markup, you can use Fragment. You can even add some style to the final outcome to make it look prettier.
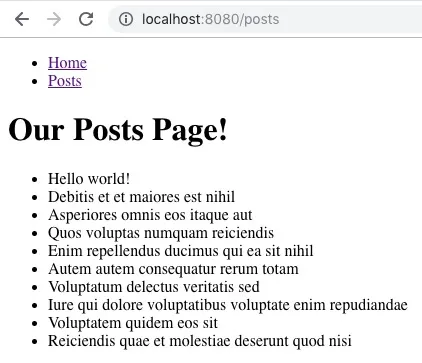
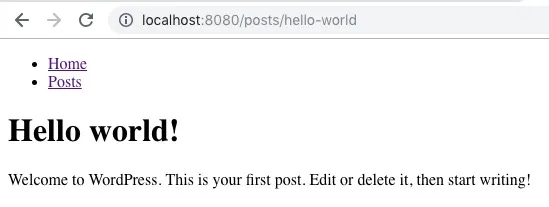
The output will be something like this:
Step 5: Accessing Our Data
Now, you have created a very simple app. We have done the routing, the client, and the server-side too. This is an extremely important aspect of Headless WordPress With React.
In order to build further, we have to get all the details from the WordPress install, which we set up in the top part.
We can use a package known as Axios to make API requests. Since React recommends Fetch, you can opt for that option too.
First, we will be making API requests in the file we made, and then we can convert our default function to a class that extends React.component.
We do this so that we can set our API data. Now, let us break down the API request part by part.
// Resolve promise and set initial props.

static async getInitialProps () {

  // Make requests for posts.

  const response = await axios.get( 'https://wordpress.test/wp-json/wp/v2/posts')

  // Return response to posts object in props.

  return {

 posts: response.data

  }

}
We will get our data. But in order to make them appear like a list, we have to do the following command.
render() {

 return (

   <Fragment>

     <Navigation/>

     <h1>Our Posts Page!</h1>

     <ul>

       {

         this.props.posts.map( post => {

           return (

             <li key={ post.id }>{ post.title.rendered }</li>

           )

         })

       }

     </ul>

   </Fragment>

 )
The output will be something like this:
The final post.js will be something like this:
import Navigation from '../components/Navigation'

import React, { Component, Fragment } from 'react'

import axios from 'axios'

export default class extends Component {

  // Resolve promise and set initial props.

  static async getInitialProps() {

    // Make request for posts.

    const response = await axios.get( 'https://wordpress.test/wp-json/wp/v2/posts' )

    // Return response to posts object in props.

    return {

      posts: response.data

    }

  }

  render() {

    return (

      <Fragment>

        <Navigation/>

        <h1>hOur Posts Page!</h1>

        <ul>

          {

            this.props.posts.map( post => {

              return (

                <li key={ post.id }>{ post.title.rendered }</li>

              )

            })

          }

        </ul>

      </Fragment>

    )

  }

}
Step 6: Dynamic Routing
Now, things will be a bit complicated. We will need a custom server that handles all of it for us.
For this, we will use a middleware along with Next.js called next-routes with the custom server. This makes things easier. You have to install them.
Let us make some new files on the root of the whole project called: routes.js and a server.js.
Next, you will have to import next-routes, and we will add this to our routes.
Inside our server, we will end up with this.
const express = require( 'express' );

const next = require( 'next' );

// Import middleware.

const routes = require( './routes' );

// Setup app.

const app = next( { dev: 'production' !== process.env.NODE_ENV } );

const handle = app.getRequestHandler();

const handler = routes.getRequestHandler( app );

app.prepare()

  .then( () => {

 // Create server.

 const server = express();

 // Use our handler for requests.

 server.use( handler );

 // Don't remove. Important for the server to work. Default route.

 server.get( '*', ( req, res ) => {

   return handle( req, res );

 } );

 // Get current port.

 const port = process.env.PORT || 8080;

 // Error check.

 server.listen( port, err => {

   if ( err ) {

     throw err;

   }

   // Where we starting, yo!

   console.log( `> Ready on port ${port}...` );

 } );

  } );
Now, you have set up the environment, our app, and manage the requests in both boilerplates. You have set up your server with const server = express(); in this step.
You have to make sure that you use our handler with and add the default route for the server to work properly. Add our listener to output error so that we will get errors in our log.
Finally, you have to let the server know where one should be opening the browser to. That is http://localhost:8080/
In order to work perfectly, you have to update some things. In our file package.json, we have to update dev and start scripts.
"scripts": {

  "dev": "node server.js",

  "build": "next build",

 "start": "NODE_PATH=. NODE_ENV=production node server.js"

},
Now, our app is running like before, but if you click anything, it will result in Error404. This is because we didn’t add our first post.
Step 7: Single Post Template
In this step, we need to add a new file called single.js in the pages directory. This will match your route in the file. And run the following command.
.add( 'single', '/posts/:slug' )
It is now up and running!
It is not finished yet. We will have to make a request and save that to props with the help of getInitialProps option.
Inside this option, we have the required access to context which we will use to get the current queried slug for making our API request.
Next, in single.js do this:
import Navigation from '../components/Navigation'

import React, { Component } from 'react'

import axios from 'axios';

import { Fragment } from 'react'

export default class extends Component {

  // Resolve promise and set initial props.

  static async getInitialProps( context ) {

 const slug = context.query.slug

 // Make requests for posts.

 const response = await axios.get( `https://wordpress.test/wp-json/wp/v2/posts?slug=${ slug }` )

 // Return our only item in the array from response to posts object in props.

 return {

   post: response.data[0]

 }

  }

  render() {

 return (

   <Fragment>

     <Navigation/>

     <h1>Your soon to be single post!</h1>

   </Fragment>

 )

  }

}

 Now in our renderer() function let us make some updates for it to work properly.

render() {

  return (

 <Fragment>

   <Navigation/>

   <h1>{ this.props.post.title.rendered }</h1>

   <article

     className="entry-content"

     dangerouslySetInnerHTML={ {

       __html: this.props.post.content.rendered

     } } />

 </Fragment>

  )

}
Now you will get the output
{ this.props.post.content.rendered}
And when you refresh, you will get the desired output.
Step 8: The Metadata
Now, the only thing that is stopping our site from being a full-fledged website is Metadata. It includes various things like title or description or element related things like width name etc.
For this, first import Head from Next.js. This gives us access to a new component that we need to add to our metadata.
Now, add this command:
import Head from 'next/head'

import Navigation from '../components/Navigation'

import { Fragment } from 'react'

export default () => (

  <Fragment>

 <Navigation/>

 <Head>

   <title>This is our page title!</title>

   <meta name="description" content="This is an example of a meta description. This will show up in search results." />

   <meta charSet="utf-8" />

   <meta name="viewport" content="initial-scale=1.0, width=device-width" />

 </Head>

 <h1>Your new server-side rendered React.js app!</h1>

  </Fragment>

)
You won’t get to see any major changes, but you could see that the page title appears.
Headless WordPress Using WordPress REST API Plugin & React
Step 1: Create New WordPress Installation
You have got lots and lots of resources on the internet for setting up a WordPress Installation. If you haven’t done this before, you might not have the basic requirements, and local setup.
This is a fundamental step in the Headless WordPress With React process.
There are a lot of solutions, but the best and most appreciated ones are solutions like MAMP and DesktopServer.
These out of the box solutions are the best to join quickly. After setting up the WordPress installation, you can visit your admin dashboard from the following link
http://your-site.dev/wp-admin
Step 2: Installing WordPress REST API Plugin
This is a step that is needed if your WordPress Installation version is older than 4.7. You can check the version details in the dashboard. If you have e version 4.7 or higher, you are good to go.
If your version is less than 4.7, then you have to go to the plugin, add new and search for “WordPress REST API (Version 2)”. Now, you have to install it and then activate it, and you are good to go.
Step 3: Sanity Check
Take your favorite API request tool. You can choose the Terminal Window if it is what you prefer. Send a GET request to http://your-site.dev/wp-json/.
You should get back some JSON response. This response contains all the information regarding your WordPress site’s resources and their respective end-points.
If you want a Demo, you have to send a request to http://your-site.dev/wp-json/wp/v2/posts/1
You will get back from JSON with all the information regarding “HELLO WORLD” which is the basic test post that comes in with all new WordPress installs.
Step 4: Install All Plugins For Project
You will have to install the plugins required for the Demo Project. After downloading the necessary Plugins, you can go ahead with this step. You can also search up and install these plugins.
CPT UI
CPT or Custom Posts Types is the best and most powerful feature of WordPress. Just as the name implies, it helps you to create custom content types. It also goes very far beyond default posts and pages that WordPress ships.
For the demo project, we will name the CPT we create as Movies.
There are two ways to do this
- Manually
- Instantly
If you want to do it instantly just copy and paste the command below:
{"movies":{"name":"movies","label":"Movies","singular_label":"Movie","description":"","public":"true","publicly_queryable":"true","show_ui":"true","show_in_nav_menus":"true","show_in_rest":"true","rest_base":"movies","has_archive":"false","has_archive_string":"","exclude_from_search":"false","capability_type":"post","hierarchical":"false","rewrite":"true","rewrite_slug":"","rewrite_withfront":"true","query_var":"true","query_var_slug":"","menu_position":"","show_in_menu":"true","show_in_menu_string":"","menu_icon":"","supports":["title","editor","thumbnail"],"taxonomies":[],"labels":{"menu_name":"","all_items":"","add_new":"","add_new_item":"","edit_item":"","new_item":"","view_item":"","search_items":"","not_found":"","not_found_in_trash":"","parent_item_colon":"","featured_image":"","set_featured_image":"","remove_featured_image":"","use_featured_image":"","archives":"","insert_into_item":"","uploaded_to_this_item":"","filter_items_list":"","items_list_navigation":"","items_list":""},"custom_supports":""}}
Next, let us see how we do it manually.
- Go to CPT UI and select Add/Edit Post Types
- Enter movies for the Post Type slug. WordPress will use this URL slug.
- Plural label- enter movies. Singular label – enter movie
You have to keep in mind that you have to set the “Show in REST API” option to true( which is in default as false). And also, right below this option, you have entered movies in the “REST API base slug.”
To scroll all the way down and select Add Post Type option
Now, you can find a Movie option appearing in the sidebar.
We can also add custom fields to our project. Advanced Custom fields are the plugin for WordPress React Custom Fields.
To expose your custom feed to API, you will have to install the community called ACF to REST API, which will immediately expose your custom feed to API.
Step 5: Post Data Import
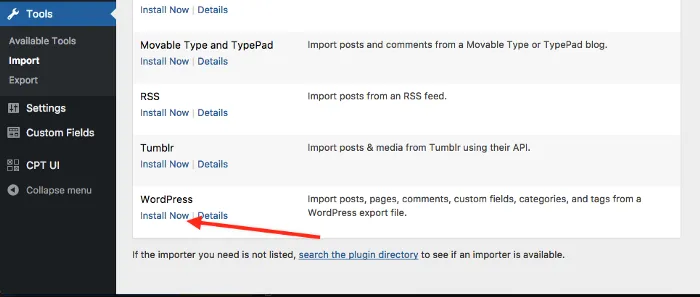
This is our last step in completing our data. First, you have to import all the movies. After the installation, you will see a link to run the importer.
Now they will ask you to assign the imported posts to an author. Just need to add your default admin account and just submit it.
Need to go to movies and then ‘all movies’. Find the list of movies that you entered. You can see the images for the movies too.
Step 6: Install Create React App
For this step, you must have Node and npm installed in your system. You just have to run this command.
npm install -g create-react-app
Voila! You are ready to use the Create React App. This is an essential part of React JS WordPress combo.
Step 7: Create An App
cd into the directory that you want to create the front-end and Run the following code:
create-react-app headless-wp
It takes a bit of time, and once it’s done, you will be able to cd into the new directory headless-wp. Now enter this code:
npm start
This command will boot up a Webpack Dev Server, and your browser will direct you to http://localhost:3000.
Read also: 15 Of The Famous Companies Using ReactJS
Step 8: Create A Component
- Creating a component is a very easy task. So, instead of creating one, we will edit our components by following these steps
- Delete all the existing codes found in App.js component.
- Now, create the render() function for this component.
- Now, let us get the data that we stored in WordPress about Star Wars movies.
- We just added two new functions to render() function which are constructor() and componentDidMount(). constructor() is where we should initialize the state. componentDidMount() fires after the component mounts.
- Now, we will take the response and parse it as JSON and then now push it into our state object. Our component enters by firing render() function because of the change in state
- Add a bit of extra code render() function so that it will take JSON in our state.
- Add map our every movie with the respective div and store them into the movie variable inside our render() function.The whole process is summed up in the code below:
import React, { Component } from 'react';class App extends Component {

  constructor() {

 super();

 this.state = {

   movies: []

 }

  }componentDidMount() {

 let dataURL = "http://headless-wp.dev/wp-json/wp/v2/movies?_embed";

 fetch(dataURL)

   .then(res => res.json())

   .then(res => {

     this.setState({

       movies: res

     })

   })

  }render() {

 let movies = this.state.movies.map((movie, index) => {

   return <div key={index}>

   <img src={movie._embedded['wp:featuredmedia'][0].media_details.sizes.large.source_url} />

   <p><strong>Title:</strong> {movie.title.rendered}</p>

   <p><strong>Release Year:</strong> {movie.acf.release_year}</p>

   <p><strong>Rating:</strong> {movie.acf.rating}</p>

   <div><strong>Description:</strong><div dangerouslySetInnerHTML={ {__html: movie.acf.description} } /></div>

   </div>

 });return (

   <div>

     <h2>Star Wars Movies</h2>

     {movies}

   </div>

 )

  }

}export default App;
Benefits Of Using WordPress Headless
Flexibility: Using Headless WordPress gets flexible enough for you to create any type of website that gives you the benefit of modifying or presenting your front end (website visible to users) with any kind of web technology and handle all its content using headless CMS.
Ease in coding: There might appear situations where you get obliged to use either Angular or React for your existing website to add some blog features.
In that case, instead of coding the whole system, which you might normally do in most WordPress, you can simply use headless CMS to manage the content with the help of the REST API that will spare some time for you.
Cutting out the middleman: The benefit of using headless WordPress is that you get the chance to remove the middleman, which means the normal WordPress, which slows down the process by loading all types of scripts, support, and styling to work properly.
With Headless WordPress, you just need to focus on the Front end website by creating pages that are lightweight and easy to load with the help of the Rest API, which will fetch and display the content to the users.
Conclusion
You now know how everything about WordPress and why it is easily chosen over other platforms.
Plan now to hire dedicated developers from eSparkBiz that will help you integrate Headless WordPress with React and develop effective solutions for you with ease.
The various Benefits of WordPress resulted in its success, and this is why it is very famous. React, and WordPress is one powerful duo!
You also know that Using React with WordPress could create wonders. There are a lot of things you could do with WordPress and React. Wait no more and plan to hire ReactJS developers from India and create wonders in your next project.
You should not stop at these very basic things. Go on and explore the wonders that React and WordPress could create.
We hope you had a great time reading this article and it proves to be of great value for any Dedicated React JS Development Company in the near future.

