According to the latest web technology, there is a stable transfer of information from one end to another without any issue, which users don’t observe much. Example: Chat App. Today, we will talk about Long Polling In Node.js in detail.
In this scenario, the information travels in two ways, the client sends a request to the server, and the server replies to the client. Earlier, the situation was different and web pages got reloaded each time a client sent a request to the server.
To resolve this, Best Node js Development Company utilizes Ajax to send XHTMLTTR requests to the server without the page reloads.
One essential way to fix this is through periodic polling, where one can send requests to the server at specific intervals of time.
Because there are some serious drawbacks of polling, developers have switched to long polling.
Here, in this blog, we will explain long polling, the major differences between regular polling & long polling, and examples of long polling.
Overview of Node JS Long Polling

Long polling is an effective method of making a highly-stable connection with the server, without using any protocols like WebSocket or Server Side Events.
In other words, Long Polling functions on the top of the classic client-server model. Here, the client sends the request and the server will respond when it contains new & specific information until then the connection will be open.
As soon as the server responds, the client can send another request and the server returns a query when data is available. This process operates when the client app stops and requests from the server end.
Difference Between Regular Polling & Long Polling
Let’s dig deep into polling to understand the difference between regular polling and long polling:
Regular Polling
The easiest method to fetch information from the server is through periodic polling. Here, to achieve this, one can utilize the set Interval function along with the Ajax call to the server every x seconds.
Now, the server initially understands that the client is online and then provides the client with a message available at the moment.

The process operates as it is. However, there are some serious drawbacks to it as follows:
- Messages are sent to the client with a delay of 10 seconds.
- The whole process is incompetent when new data is not available, but every request is going to the server and receiving null responses.
This method works well in case of small services; however, it definitely requires an update.
Long Polling

Long polling is way better as compared to normal polling. Let’s know-how.
It is quick to implement and provides information without any delays.
Here is the process:
- The client(assume it is a browser) makes a request to the server.
- Here, the connection remains open and the server doesn’t send a response until it has found particular data.
- As & when new data is available, the server sends it to the client.
- Now, the browser can send a new request instantly.
The condition when the browser sends a request and consists of a pending connection with the server is normal in this approach. As soon as the message gets delivered, the connection is established again.
Due to any reason, if the connection gets lost, the client can instantly make a new request.
A Typical Web Server with Node.js
A typical web server In Node.js Architecture that instantly responds to the request for Node JS Long Polling might contain the code given below:
var http = require('http');

http.createServer(function (req, res) {

  res.writeHead(200, {'Content-Type': 'text/plain'});

  res.end('Hello Worldn');

}).listen(8124, "127.0.0.1");

console.log('Server running at http://127.0.0.1:8124/');
The code displays that the request is served and responds with the code given below:
res.writeHead(200, {'Content-Type': 'text/plain'});

res.end('Hello Worldn');
In fact, omitting some lines of code will result in a server that doesn’t respond anytime. This is not the primary purpose; however, you can start here:
var http = require('http');

http.createServer(function (req, res) {

  // res.writeHead(200, {'Content-Type': 'text/plain'});

  // res.end('Hello Worldn');

}).listen(8124, "127.0.0.1");

console.log('Server running at http://127.0.0.1:8124/');
This is how you can hold the server for some time. Possibly by keeping these lines in the conditional statement and regularly waiting for an event to take place will do the work.
var http = require('http');

http.createServer(function (req, res) {

  if (something) {

     res.writeHead(200, {'Content-Type': 'text/plain'});

     res.end('Hello Worldn');

  }

}).listen(8124, "127.0.0.1");

console.log('Server running at http://127.0.0.1:8124/');
Looping Server
As mentioned in the snippet above if you keep the response in a conditional loop, you will get a reply only after an event has triggered.
The main purpose is to run this loop at regular intervals and verify that the condition is correct. This is an essential step in Node JS Long Polling.
In case your server’s code is in the server.js, begins with the “node server.js” command, then insert the snippet given below:
var http = require("http"),

    fs  = require("fs");

// we create a server with automatically binding

// to a server request listener

http.createServer(function(request, response) {

checkFile(request, response);

}).listen(8124);

function checkFile(request, response)

{

var date = new Date();

if (date-request.socket._idleStart.getTime() > 59999) {

response.writeHead(200, {

'Content-Type'   : 'text/plain',

'Access-Control-Allow-Origin' : '*'

});

// return response

response.write('OK', 'utf8');

response.end();

}

// we check the information from the file, especially

// to know when it was changed for the last time

fs.stat('filepath', function(err, stats) {

// if the file is changed

if (stats.mtime.getTime() > request.socket._idleStart.getTime()) {

// read it

fs.readFile('filepath', 'utf8', function(err, data) {

// return the contents

response.writeHead(200, {

'Content-Type'   : 'text/plain',

'Access-Control-Allow-Origin' : '*'

});

// return response

response.write(data, 'utf8');

response.end();

// return

return false;

});

}

});

setTimeout(function() { checkFile(request, response) }, 10000);

};
Please remember that you should update “filepath” with a current file path in your system.
Here, we can read at regular intervals, the file’s mtime, also known as the modified time. Hence, anytime the file is updated the server will reply with a message. This is important for Long Polling in Node.js.
It’s exciting to consider here if no update to Node.js Version is done within the timeout period, you have to return a status message by inserting the code given below:
var date = new Date();

if (date-request.socket._idleStart.getTime() > 59999) {

response.writeHead(200, {

'Content-Type'   : 'text/plain',

'Access-Control-Allow-Origin' : '*'

});

// return response

response.write('OK', 'utf8');

response.end();

}
The client-side must long poll this server. The primary purpose here is that on receiving the response, you should call the server again.
The Client
The client doesn’t require Jquery/JavaScript community you should get back to the server once again when the response is returned:
function callNode() {

    $.ajax({

        cache : false,

// setup the server address

        url : 'http://www.example.com:8124/',

        data : {},

        success : function(response, code, xhr) {

            if ('OK' == response) {

             callNode();

                return false;

            }

            // do whatever you want with the response

            ...

            // make new call

            callNode();

        }

    });

};

callNode();
Diving Into Long Polling

As mentioned before, Node JS Long Polling Example is a process in which the client sends to the server; however, the server provides feedback after it has got full-proof information.
Simultaneously, the client’s connection is open and it is waiting to send a new query only after the server responds with the data.
Here it is possible to establish Long Polling in Node.js on the client-side. In this process, the client creates an event loop, during downtime, or making new requests to the server.
subscribe: function(callback) {

      var longPoll = function(){

          $.ajax({

              method: 'GET',

              url: '/messages',

              success: function(data){

                  callback(data)

              },

              complete: function(){

                  longPoll()

              },

              timeout: 30000

          })

      }

      longPoll()

  }
While on the server part, the request is subscribed to the message bus. Here in Node.js, it consists of an inherent message bus and can be needed as follows: Also, you can set the max listeners to the default of 10.
var EventEmitter = require('events').EventEmitter

var messageBus = new EventEmitter()

messageBus.setMaxListeners(100)
Subscribing the request
router.get('/messages', function(req, res){

    var addMessageListener = function(res){

        messageBus.once('message', function(data){

            res.json(data)

        })

    }

    addMessageListener(res)

})
You may be thinking, when does the message bus ever fire back data to the response?
As we consist of a subscriber for an event, we will also require a publisher to start an event.
To expel this message to the message bus, the client, or any other place, we have to start a publishing event.
publish: function(data) {

    $.post('/messages', data)

}
After this, the server can send the message to the server bus.
router.post('/messages', function(req, res){

    messageBus.emit('message', req.body)

    res.status(200).end()

})
As soon as this is established, you make sure that the client has a seamless open connection to the server; however, the server is not quickly fed up with a wide variety of requests, as it keeps all the requests/ responses in a message bus to be expelled as soon as it is ready.
This approach is well-known because it is quick to establish and works well in the majority of browsers.
Although Long Polling Chat App in Node JS is known as a push-esque technology, as the client requires to begin with a request loop; however, it can continue to get a push-like process.
Example of Long Polling with Node.js & Vue.js
Here we will provide you with a step-by-step process to create Node JS Long Polling & it will also include Vue.js:
Establish A Server
We will begin for Long Polling in Node.js by establishing a server. Then we will build a fresh directory and execute the command npm init -y.
Due to this, a package.json file will be formed, which consists of the standard values and then form a server.js file in the directory’s root.
After this, install Express needed for the NodeJS server utilizing the command given below:
npm install express --save
Setting Up Server.js File
Include the code snippet given below in the server.js file to set up the server:
var http = require('http');

var path = require('path');

var express = require('express');

var router = express();

var server = http.createServer(router);

router.use('/client', express.static(path.resolve(__dirname, 'client')));

router.get('/data', function(req, res, next) {

    return res.json("hello world!");

});

server.listen(process.env.PORT || 3000, process.env.IP || "0.0.0.0", function() {

    var addr = server.address();

    console.log("Server listening at", addr.address + ":" + addr.port);

});
Here, you will observe that the above code consists of four main libraries: HTTP, path, express, and router. Also, an HTTP server is represented with the router.
After this, a static library is announced. The endpoint /client is established to help the client directory in our project that consists of the VueJS front-end.
Also, an endpoint /data is specified utilizing the router.get() method and it replies with a JSON response of hello world!.
The server is currently fixed to execute on the localhost port 3000 by default or using another port fix in the environment file.
As soon as you save the file, you can initiate the server executing the command given below:
node server.js
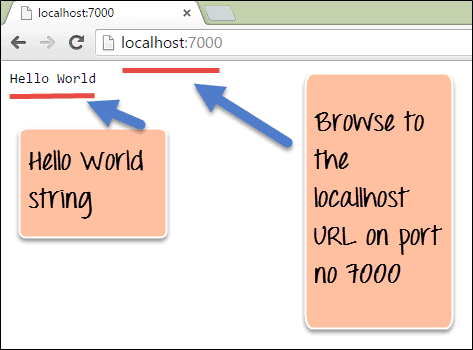
Now, when you visit http://localhost:3000/data in your browser, hello world will be displayed on the screen.
Establishing The Connection
After this, the function that is present inside the /data endpoint is updated to refresh the live data. A random number generator can be utilized to find as a when raw data is accessible.
As soon as the request is created, the connection will be retained for an arbitrary number of seconds (as per the random number generator) prior to showing the time in milliseconds.
The response object can merely be described as the time in milliseconds. Also, you will not get any kind of response. This is important for Long Polling in Node.js execution.
To resolve the connection timeout issue, the connection is ended, and a flag known as hasValue is set to false.
The front-end system utilizes this flag to manage and determine if the data obtained from long polling is considered a UI repaint.
router.get('/data', function(req, res, next) {

    const time = (new Date()).getTime();

    let seconds = Math.random() * 10000;

    if (seconds < 1000) {

        return res.json({hasValue: false, value: null});

    }

    if (seconds > 8000) {

        seconds = 60000;

    }

    console.log("waiting seconds before responding", seconds);

    return setTimeout(function () {

        return res.json({hasValue: true, value: time});

    }, seconds);

});
Even now, you can visit http://localhost:3000/data in your browser; however, rather than viewing a demo that shows hello world, you will see a number. In case you revive the screen a few times, you should notice that every call takes a different amount of time.
Here, at times the issue gets resolved instantly, and at other times, it waits for some seconds prior to displaying the response data.
By following this process, we are ‘mocking’ the API to imitate the original system where web sockets & long-polling are suitable for obtaining real-time data when modified.
Setting Up Front-End
As the backend is working as required, we can shift our focus towards the front-end that’s present inside the /client directory.
To remove any issues of working with jQuery, the front-end will utilize the CDN-hosted version of VueJS. Form a new index.html file inside the /client directory as given below:
<html>

<head>

    <title>Long Polling Example</title>

</head>

<body>

    <div id="long-polling-app">

        <div>

            <h1>Long Polling Example</h1>

        </div>

        <div>

            <table>

                <tr>

                    <th>Responses</th>

                </tr>

                <tr>

                    <td>

                        No responses!

                    </td>

                </tr>

            </table>

        </div>

    </div>

    <script src="https://cdn.jsdelivr.net/npm/vue/dist/vue.js"></script>

    <script src="https://cdn.jsdelivr.net/npm/[email protected]"></script>

</body>

</html>
Now, a primary screen is specified that shows a table with only a single row. Prior to the closing <body> tag, a <script> tag is utilized to import the VueJS library and the Vue Resource library to initiate any of the HTTPS calls efficiently.
Making Use Of Vue.js
Now, you have to specify the logic, utilizing VueJS, that will reach out to the /data endpoint and represent the table as it comes.
This enables the employees to look after the data screen in real-time same as the web sockets! This is essential for Node JS Long Polling execution.
Now here form a new inline <script> tag following the Vue Response import and insert the code-snippet given below:
var app = new Vue({

        el: '#long-polling-app',

        data: {

        responses: []

    },

    created: function () {

        this.getData();

    },

    methods: {

        getData: function () {

            this.requests.push((new Date().getTime()));

            return this.$http.get('http://localhost:3000/data')

            .then(response => {

                if (response.body.hasValue === true) {

                    this.responses.push(response.body.value);

                    return;

                }

                return;

            })

            .then(function () {

                return this.getData();

            })

        }

    }

});
The code given above specifies a Vue element known as the long-polling app along with one property known as responses. Here a getData() is also provided, which sends a request to the /data endpoint.
As soon as it obtains a response from the server, it verifies whether hasValue is true or not. In case it is true, then it will integrate value to the responses array, and then call itself, getData(), again.
The created() function runs when the app gets loaded and addressed itself in the browser. Here, the created() function requires the getData() function instantly.
When the page loads, the server will instantly begin the long-polling procedure. Each time the request is sent, the server will reply only after particular data is present.
The client has to modify the screen regularly and then promptly initiate the next request. In short, it is a long polling process explained with an example.
A call to getData() is also mentioned in .then() function() to do a call again in case it fails for any reason.
This works well in terms of a standard example, but in case of real application, a failed request will require to be managed more effectively.
For instance, the HTTP 404 response is doubtful to be resolved by carrying out the call again so soon.
Integrating Vue.js Into HTML
Lastly, the VueJS script requires to leap into the HTML by which the user obtains visual feedback while the long-polling process executes well in the background.
Here, update the table-row in the HTML to showcase the responses array:
<tr v-for="response in responses">

    <td>

        {{response}}

    </td>

</tr>
Here, VueJS will modify the DOM in the browser. Step by step process is given below:
- The page gets loaded in the http://localhost:3000/client/index.html.
- VueJS bootstraps and the created() function commences the primary getData() call to the /data endpoint.
- js is the function that is present inside the /data endpoint. It utilizes a random number generator to determine the total amount of time; a connection should be open. This forces the presence of new real-time data.
- In several cases, the hashValue flag is kept false to check whether the connection is properly executed to avoid the HTTP timeout.
- As long as new data is available, the connection is resolved by keeping the hasValue flag set to be true.
- The VueJS gets the response and modifies the screen accordingly (Here it adds a new row into the table).
- Instantly after obtaining the response, the VueJS client initiates upcoming requests.
- The process is repeated n number of times till connection with server gets closed, or browser window is terminated.
Conclusion
We hope by reading through this blog, you have got a detailed understanding of Node JS Long Polling, and how it can be used with the latest frameworks like Node.js and Vue.js.
Hire dedicated Node.js developers so that they can use Long Polling in Node.js for their web development projects to get effective benefits associated with it.
This includes less loading on the server, reduced traffic, and support on any browser.
-
What Is Short Polling?
Short Polling is nothing but an AJAX-based timer that calls the server after a fixed amount of delays.
-
Difference Between Long Polling Websocket & Server-Sent Events
Websocket is a two-way communication channel and there is a need for polling. While Server-Sent Events are a one-way communication channel.
-
What Is SQS Long Polling?
Amazon SQS Long Polling is one of the smartest ways of retrieving messages from Amazon SQS queues.
-
Does Facebook Make Use Of long polling?
The simple answer to this would be NO. Facebook doesn’t make use of websockets. However, it does make use of long polling.


