Node.js has gained widespread acceptance in both businesses & software communities. This is because it is a JavaScript runtime environment that can be deployed on numerous Internet browsers. Today, we will learn about using Node.js With MySQL using Sequelize.
A key advantage of Node.js is its ‘JavaScript everywhere’ paradigm. Thus, it streamlines application development into one language, as opposed to differing ones for client and server scripts. Therefore experts always suggest to opt for Adept Node js Development Company for making the development process feasible.
A flexible and minimalist Node.js framework, Express incorporates many features to develop both mobile and web-based apps, some of which comprises setting up middleware, defining routing tables, and dynamically rendering HTML pages on the basis of passing arguments to standard templates.
Node.js framework possess unique functionalities for driving the project through key project requirements and lead it towards the desired results. Hire programmer from India for smoothening your development process and achieve high quality results with budget-friendly benefits.
Large SQL databases can often be challenging to manage and this is where Sequelize comes into play. Sequelize is essentially an Object-Relational Mapper i.e., it plots an object syntax into database schemas. This is accomplished with the help of Node.js as well as JavaScript.
Guide For Using Node.js With MySQL
Overview Of Node.js REST CRUD API
REST, an acronym for ‘Representational State Transfer’, determines how the API appears, while CRUD is an abbreviation for ‘Create, Read, Update, and Delete’.
With respect to REST API, CRUD is the standard form of HTTP action verbs. Knowing this API in detail will help you to know the ways to utilize Node.js With MySQL.
To build REST API in a Node.js runtime environment, the user performs the following steps:
1. Open an Express web server
2. Add configuration data for an existing MySQL database
3. Open Sequelize
4. In Sequelize, create a Tutorial model
5. Write the controller
6. Define all the routes for handling every CRUD function
Note – Include custom finder in the definition.
7. Open Postman
8. Test the REST CRUD API
And it’s done!
To better understand the REST CRUD API exported, refer to the below table-
| Methods | URL | Action |
|---|---|---|
| GET | api/tutorials | get all Tutorials |
| GET | api/tutorials/:id | get Tutorial by id |
| POST | api/tutorials | add new Tutorial |
| PUT | api/tutorials/:id | update Tutorial by id |
| DELETE | api/tutorials/:id | remove Tutorial by id |
| DELETE | api/tutorials | remove all Tutorials |
| GET | api/tutorials/published | find all published Tutorials |
| GET | api/tutorials?title=[kw] | find all Tutorials which title contains ‘kw’ |
Tools Required for Building REST CRUD API
There are a number of tools that can be effectively deployed to build REST CRUD API. Some of the most widely deployed ones are:
Express – Express.js, or more commonly known as Express, is a web application framework for Node.js. Express is considered de-facto for Node.js framework as it is free, open-source, fast, and minimalist.
Sequelize – A promise-based ORM for MySQL, Sequelize incorporates robust read replication, lazy loading, transaction relations, and support. Sequelize enables users to manage large SQL databases. It also makes Node.js With MySQL concept a reality.
MySQL– An open-source relational database management system (RDBMS), MySQL is backed by the Oracle Corporation and is free to use. Furthermore, the source code can be easily customized as per user requirements.
After knowing these tools, you will be able to decode the Node.js MySQL Example with the utmost ease.
Available Data Types In Sequelize
The data types supported by Sequelize Docs are as under:
| Sequelize.STRING | VARCHAR(255) |
|---|---|
| Sequelize.STRING(1234) | VARCHAR(1234) |
| Sequelize.STRING.BINARY | VARCHAR BINARY |
| Sequelize.TEXT | TEXT |
| Sequelize.TEXT(‘tiny’) | TINYTEXT |
| Sequelize.CITEXT | CITEXT |
| Sequelize.INTEGER | INTEGER |
| Sequelize.BIGINT | BIGINT |
| Sequelize.BIGINT(11) | BIGINT(11) |
| Sequelize.FLOAT | FLOAT |
| Sequelize.FLOAT(11) | FLOAT(11) |
| Sequelize.FLOAT(11,10) | FLOAT(11,10) |
Pros and Cons of Sequelize
Pros:
- Sequelize reduces complexity by eliminating the subtle differences between various SQL implementations.
- It also provides built-in middleware, thus enabling individual customization for errors in each field.
- Incorporates a promise-built library, allowing the user to better manage exceptions and unexpected results.
- Sync databases on a changed model basis, thereby altering or automatically creating tables as per user requirements.
- Lastly, Sequelize can query all complicated join functions. The user only needs to learn how ‘Objects’ connect with one another.
Cons:
- Sequelize Could generate complicated queries on occasion. For example – In a model definition, Sequelize does not understand relationships when it is “hasOne”.
- It lacks the NoSQL support. Sequelize includes some inexplicable exceptions when additional connections to the database needs to be created.
Creating Node.js Application
A Node.js app comprises three components:
- Import required modules – The required directive is necessary for loading Node.js modules.
- Create server – A server listens to the user’s request.
- Read request and return response – The server created reads the HTTP request and returns a response.
Knowing all these components will give you a headstart for understanding the concept of Node JS With MySQL. So, you should give prime importance to this subject.
To create a Node.js app, the user performs the following steps:
1. Create a folder.
$ mkdir nodejs-express-sequelize-mysql

$ cd nodejs-express-sequelize-mysql
2. In the file manager, open a json file.
3. Initialize the Node.js App.
npm init

name: (nodejs-express-sequelize-mysql)
version: (1.0.0)
description: Node.js Rest Apis with Express, Sequelize & MySQL.
entry point: (index.js) server.js
test command:
git repository:
keywords: nodejs, express, sequelize, mysql, rest, api
author: esparkinfo
license: (ISC)
Is this ok? (yes) yes
4. Install the modules sequelize, body-parser, mysql2, and express.
5. Run the command.
npm install express sequelize mysql2 body-parser cors --save
6. The final package.json file must appear as follows:
{
  "name": "nodejs-express-sequelize-mysql",
  "version": "1.0.0",
  "description": "Node.js Rest Apis with Express, Sequelize & MySQL",
  "main": "server.js",
  "scripts": {
    "test": "echo "Error: no test specified" && exit 1"
  },
  "keywords": [
    "nodejs",
    "express",
    "rest",
    "api",
    "sequelize",
    "mysql"
  ],
  "author": "esparkinfo",
  "license": "ISC",
  "dependencies": {
    "body-parser": "^1.19.0",
    "cors": "^2.8.5",
    "express": "^4.17.1",
    "mysql2": "^2.0.2",
    "sequelize": "^5.21.2"
  }
}
Setting Up Express JS Web Server
To setup an Express JS Web Server, the user performs the following steps:
1. Open Windows Explorer.
2. Navigate to the root folder.
3. In the root folder, create a new server.js file.
const express = require("express");
const bodyParser = require("body-parser");
const cors = require("cors");

const app = express();

var corsOptions = {
  origin: "http://localhost:8081"
};

app.use(cors(corsOptions));

// parse requests of content-type - application/json
app.use(bodyParser.json());

// parse requests of content-type - application/x-www-form-urlencoded
app.use(bodyParser.urlencoded({ extended: true }));

// simple route
app.get("/", (req, res) => {
  res.json({ message: "Welcome to esparkinfo application." });
});

// set port, listen for requests
const PORT = process.env.PORT || 8080;
app.listen(PORT, () => {
  console.log(`Server is running on port ${PORT}.`);
});
4. Import the cors, body-parser, and express modules.
Note – body-parser parses the request for creating req.body object. Express builds REST APIs, while cors provides Express middleware for allowing CORS with different options.
5. Create an Express app.
6. Using use()method, add cors and body-parser middlewares.
Note – Origin is set as ‘http://localhost:8081’.
7. Define a GET route.
Note – Ensure the route is simple and easy to test.
8. Tune into port 8080 for incoming requests, if any.
9. Run the app with the command: node server.js.
10. Open a web browser.
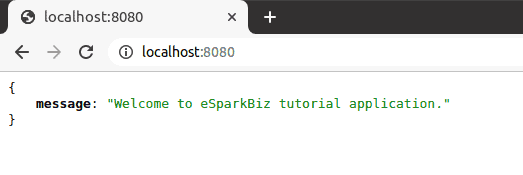
11. In the Address bar, type http://localhost:8080/.
The following text appears.
Configuring MySQL Database & Sequelize
This is such a critical step in Node JS With MySQL using Sequelize. Configuration is such an important aspect of development and the same is here as well.
The Node Sequelize combination works on the basis of this configuration. So, let’s have a look.
The user performs the following steps:
1. Open Windows Explorer.
2. Navigate to the app folder.
3. Within the app folder, create a config folder as a db.config.js file as under:
module.exports = {

HOST: "localhost",

USER: "root",

PASSWORD: "123456",

DB: "testdb",

dialect: "mysql",

pool: {

max: 5,

min: 0,

acquire: 30000,

idle: 10000

}

};
Note – The first five parameters are intended for MySQL. The pool parameter is optional and is deployed in the Sequelize connection pool config. The parameters are explained below.
- max -maximum number of connections permissible in a pool
- min – minimum number of connections permissible in a pool
- idle – maximum time, in terms of milliseconds, that a connection can be held idly before being released
- acquire – maximum time, in terms of milliseconds, that the pool seeks to make the connection before an error message pops up on screen
Initializing Sequelize
The user performs the following steps:
1. Open Windows Explorer.
2. Navigate to the app folder.
3. In the app folder, create a models folder.
4. In the models folder, create index.js by entering the following code :
const dbConfig = require("../config/db.config.js");

const Sequelize = require("sequelize");
const sequelize = new Sequelize(dbConfig.DB, dbConfig.USER, dbConfig.PASSWORD, {
  host: dbConfig.HOST,
  dialect: dbConfig.dialect,
  operatorsAliases: false,

  pool: {
    max: dbConfig.pool.max,
    min: dbConfig.pool.min,
    acquire: dbConfig.pool.acquire,
    idle: dbConfig.pool.idle
  }
});

const db = {};

db.Sequelize = Sequelize;
db.sequelize = sequelize;

db.tutorials = require("./tutorial.model.js")(sequelize, Sequelize);

module.exports = db;
Note – The user must not forget to summon the sync () method in server.js.
...
const app = express();
app.use(...);

const db = require("./app/models");
db.sequelize.sync();

...
5. If existing tables need to dropped and the database resynced, enter force: true as the following code :
db.sequelize.sync({ force: true }).then(() => {

console.log("Drop and re-sync db.");

});
Defining The Sequelize Model
The user performs the following steps :
1. Open Windows Explorer.
2. Navigate to the models folder.
3. In the models folder, create a tutorial.model.js file by entering the following script :
module.exports = (sequelize, Sequelize) => {

const Tutorial = sequelize.define("tutorial", {

title: {

type: Sequelize.STRING

},

description: {

type: Sequelize.STRING

},

published: {

type: Sequelize.BOOLEAN

}

});


return Tutorial;

};
Note – In MySQL databases, this model represents tutorial tables. The columns are automatically generated, a few of which are id, description, createdAt, and published.
After the system initializes Sequelize, the user need not write CRUD functions. Sequelize supports all required CRUD functions such as –
| Create Tutorial | create(object) |
|---|---|
| Find Tutorial by id | findByPk(id) |
| get all Tutorials | findAll() |
| update a Tutorial by id | update(data, where: { id: id }) |
| remove a Tutorial | destroy(where: { id: id }) |
| remove all Tutorials | destroy(where: {}) |
| find all Tutorials by title | findAll({ where: { title: … } }) |
Creating the Controller
The user performs the following steps:
const db = require("../models"); // models path depend on your structure
const Tutorial = db.tutorials;

exports.create = (req, res) => {
  // Validate request
  if (!req.body.title) {
    res.status(400).send({
      message: "Content can not be empty!"
    });
    return;
  }

  // Create a Tutorial
  const tutorial = {
    title: req.body.title,
    description: req.body.description,
    published: req.body.published ? req.body.published : false
  };

  // Save Tutorial in the database
  Tutorial.create(tutorial)
    .then(data => {
      res.send(data);
    })
    .catch(err => {
      res.status(500).send({
        message:
          err.message || "Some error occurred while creating the Tutorial."
      });
    });
};
Retrieving Objects
The user performs the following steps:
exports.findAll = (req, res) => {
  const title = req.query.title;
  var condition = title ? { title: { [Op.like]: `%${title}%` } } : null;

  Tutorial.findAll({ where: condition })
    .then(data => {
      res.send(data);
    })
    .catch(err => {
      res.status(500).send({
        message:
          err.message || "Some error occurred while retrieving tutorials."
      });
    });
};
Note – The user must use req.query.title to receive the query string from the Request. This can be considered the condition for findAll() method.
Retrieving a Single Object
To find a single Tutorial with an id, the user performs the following steps:
exports.findOne = (req, res) => {
  const id = req.params.id;

  Tutorial.findByPk(id)
    .then(data => {
      res.send(data);
    })
    .catch(err => {
      res.status(500).send({
        message: "Error retrieving Tutorial with id=" + id
      });
    });
};
Updating An Object
To update a Tutorial identified by its id, the user performs the following steps:
exports.update = (req, res) => {
  const id = req.params.id;

  Tutorial.update(req.body, {
    where: { id: id }
  })
    .then(num => {
      if (num == 1) {
        res.send({
          message: "Tutorial was updated successfully."
        });
      } else {
        res.send({
          message: `Cannot update Tutorial with id=${id}. Maybe Tutorial was not found or req.body is empty!`
        });
      }
    })
    .catch(err => {
      res.status(500).send({
        message: "Error updating Tutorial with id=" + id
      });
    });
};
Deleting An Object
To delete a Tutorial with a specific id, the user performs the following steps:
exports.delete = (req, res) => {
  const id = req.params.id;

  Tutorial.destroy({
    where: { id: id }
  })
    .then(num => {
      if (num == 1) {
        res.send({
          message: "Tutorial was deleted successfully!"
        });
      } else {
        res.send({
          message: `Cannot delete Tutorial with id=${id}. Maybe Tutorial was not found!`
        });
      }
    })
    .catch(err => {
      res.status(500).send({
        message: "Could not delete Tutorial with id=" + id
      });
    });
};
Deleting All Objects
To delete all Tutorials from an existing database, the user performs the following steps:
exports.deleteAll = (req, res) => {
  Tutorial.destroy({
    where: {},
    truncate: false
  })
    .then(nums => {
      res.send({ message: `${nums} Tutorials were deleted successfully!` });
    })
    .catch(err => {
      res.status(500).send({
        message:
          err.message || "Some error occurred while removing all tutorials."
      });
    });
};
Finding all Objects by Condition
To find all Tutorials with the condition published =true, the user performs the following steps :
exports.findAllPublished = (req, res) => {

Tutorial.findAll({ where: { published: true } })

.then(data => {

res.send(data);

})

.catch(err => {

res.status(500).send({

message:

err.message || "Some error occurred while retrieving tutorials."

});

});

};
Defining Routes
If the client sends a request for an endpoint via an HTTP request such as POST, DELETE, PUT, or GET, the user must determine how the server responds.
Such a response from the server is possible by setting up the below routes:
| /api/tutorials: GET, POST, DELETE |
| /api/tutorials/:id: GET, PUT, DELETE |
| /api/tutorials/published: GET |
To create a tutorial.routes.js inside the app/routes folder, the user performs the following steps:
module.exports = app => {
  const tutorials = require("../controllers/tutorial.controller.js");

  var router = require("express").Router();

  // Create a new Tutorial
  router.post("/", tutorials.create);

  // Retrieve all Tutorials
  router.get("/", tutorials.findAll);

  // Retrieve all published Tutorials
  router.get("/published", tutorials.findAllPublished);

  // Retrieve a single Tutorial with id
  router.get("/:id", tutorials.findOne);

  // Update a Tutorial with id
  router.put("/:id", tutorials.update);

  // Delete a Tutorial with id
  router.delete("/:id", tutorials.delete);

  // Create a new Tutorial
  router.delete("/", tutorials.deleteAll);

  app.use('/api/tutorials', router);
};
Note – A controller from the /controllers/tutorial.controller.js has been used in this procedure. The user must also include routes in the server.js. This has to be done just before the app.listen() ):
To include routes, the user performs the following steps –
require("./app/routes/tutorial.routes")(app);

// set port, listen for requests
const PORT = ...;
app.listen(...);
Testing the API
To test the APIs, the user performs the following steps:
1. Open Windows Explorer.
2. Run the Node.js application.
3. Type the command ‘node server.js’.
The following screen appears.
Server is running on port 8080.
Executing (default): DROP TABLE IF EXISTS `tutorials`;
Executing (default): CREATE TABLE IF NOT EXISTS `tutorials` (`id` INTEGER NOT NULL auto_increment , `title` VARCHAR(255), `description` VARCHAR(255), `published` TINYINT(1), `createdAt` DATETIME NOT NULL, `updatedAt` DATETIME NOT NULL, PRIMARY KEY (`id`)) ENGINE=InnoDB;
Executing (default): SHOW INDEX FROM `tutorials`
Drop and re-sync db.
Creating A Tutorial Using POST/tutorials API
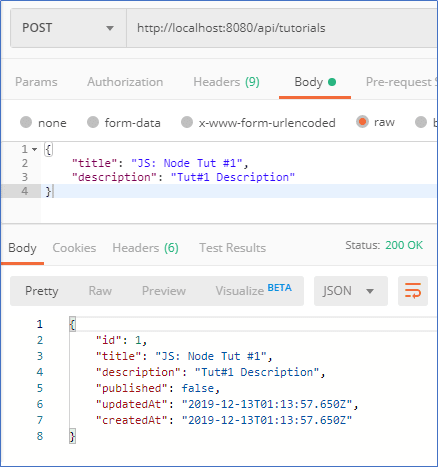
The user must test the Tutorial created in Postman. To do so, the user performs the following steps:
A Tutorial is now created.
To check the MySQL table, the user performs the following steps:
| id | title | description | published | createdAt |
|---|---|---|---|---|
| 1 | JS: Node Tut #1 | Tut#1 Description | 0 | 2019-12-13 01:13:57 |
| 2 | JS: Node Tut #2 | Tut#2 Description | 0 | 2019-12-13 01:16:08 |
| 3 | JS: Vue Tut #3 | Tut#3 Description | 0 | 2019-12-13 01:16:24 |
| 4 | Vue Tut #4 | Tut#4 Description | 0 | 2019-12-13 01:16:48 |
| 5 | Node & Vue Tut #5 | Tut#5 Description | 0 | 2019-12-13 01:16:58 |
Retrieving All Tutorials Using GET/tutorials API
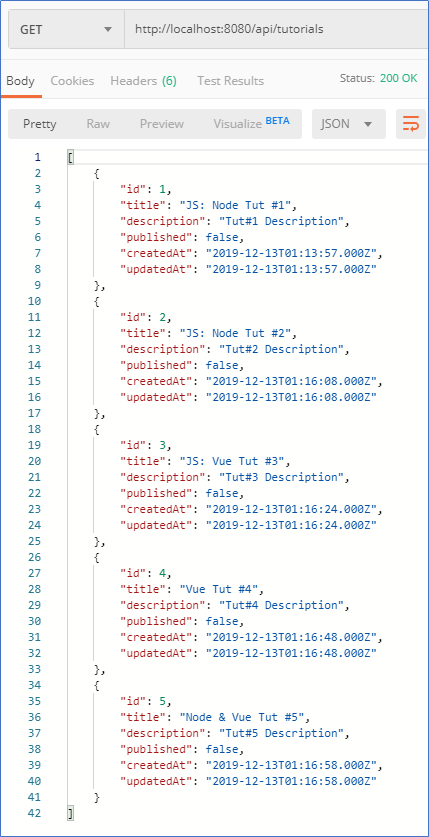
To retrieve all Tutorials, the user performs the following steps:
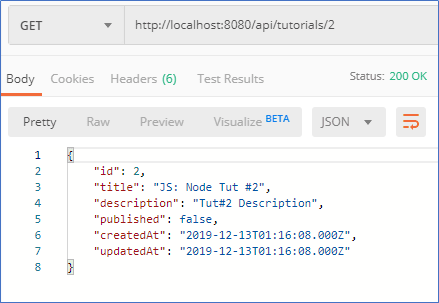
Retrieving A Single Tutorial Using GET/tutorials/:id API
To retrieve a single Tutorial, the user performs the following steps:
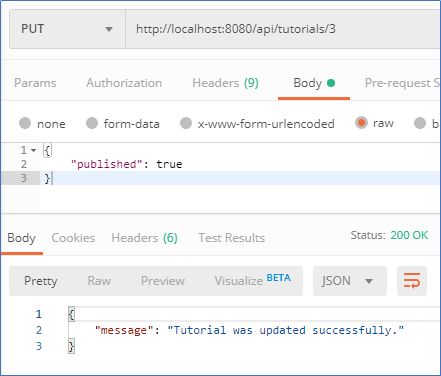
Update a Tutorial using PUT /tutorials/:id API
To update a Tutorial, the user performs the following steps:
Checking Tutorial Table After Update
To check a Tutorial table, the user performs the following steps:
mysql> select * from tutorials;
| id | title | description | published | createdAt |
|---|---|---|---|---|
| 1 | JS: Node Tut #1 | Tut#1 Description | 0 | 2019-12-13 01:13:57 |
| 2 | JS: Node Tut #2 | Tut#2 Description | 0 | 2019-12-13 01:16:08 |
| 3 | JS: Vue Tut #3 | Tut#3 Description | 0 | 2019-12-13 01:16:24 |
| 4 | Vue Tut #4 | Tut#4 Description | 0 | 2019-12-13 01:16:48 |
| 5 | Node & Vue Tut #5 | Tut#5 Description | 0 | 2019-12-13 01:16:58 |
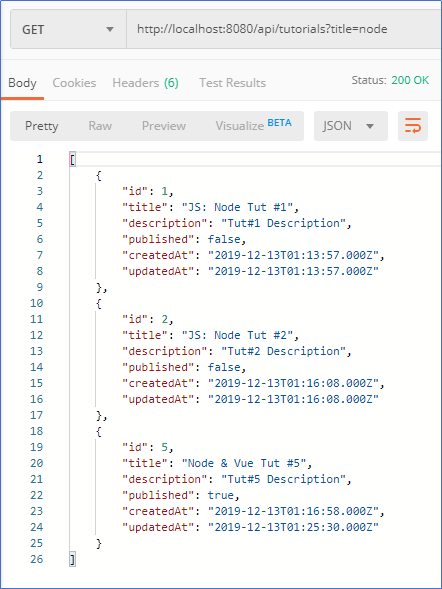
Finding All Tutorials where Title=”node” Using GET/tutorials?title=node API
To find all Tutorials with a specific title, the user performs the following steps:
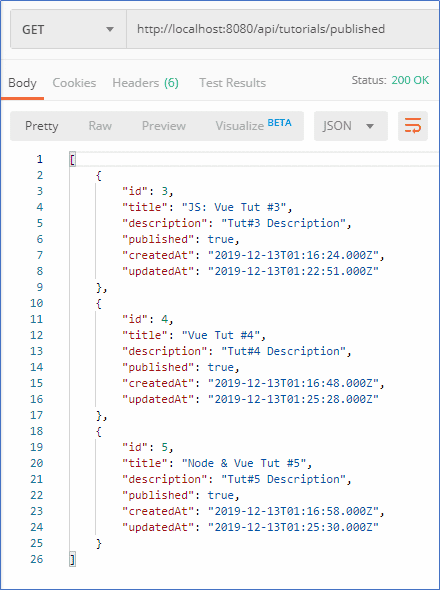
Finding All Published Tutorials Using GET/tutorials/published API
To find all published Tutorials, the user performs the following steps:
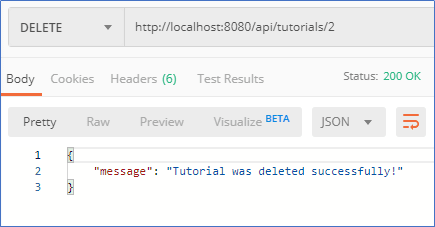
Deleting A Tutorial Using DELETE/tutorials/:id API
To delete a Tutorial, the user performs the following steps:
The Tutorial with the ‘id = 2’ is now removed from the tutorials table.
Checking Tutorial Table After Deletion of Single Row
To check a Tutorial table, the user performs the following steps:
mysql> select * from tutorials;
| id | title | description | published | createdAt |
|---|---|---|---|---|
| 1 | JS: Node Tut #1 | Tut#1 Description | 0 | 2019-12-13 01:13:57 |
| 2 | JS: Vue Tut #3 | Tut#3 Description | 0 | 2019-12-13 01:16:24 |
| 3 | Vue Tut #4 | Tut#4 Description | 0 | 2019-12-13 01:16:48 |
| 4 | Node & Vue Tut #5 | Tut#5 Description | 0 | 2019-12-13 01:16:58 |
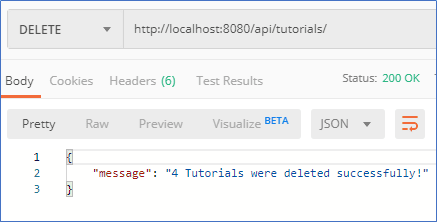
Deleting all Tutorials using DELETE /tutorials API
To delete all Tutorials, the user performs the following steps:
All the rows are now removed from the tutorials table.
Read also: Is Node.js Still The Most Popular JavaScript Framework?
Checking Tutorial Table After Deletion of All Rows
The user performs the following steps:
mysql> SELECT * FROM tutorials;
The following appears.
Empty set (0.00 sec)
Conclusion
The document gives the reader a crisp and concise picture of Node.js REST CRUD APIs, Web Express Servers, MySQL databases, and Sequelize.
The advantages and disadvantages of Node.js With MySQL and Sequelize allows the reader to make a comparative study of the library, while creating the controller, defining routes, and testing APIs are vital from a smooth software functioning perspective.
We hope this article will be of great help while if you’re planning to hire NodeJS developers who works with MySQL database for an app.
-
Can I Use MySQL With Node.js?
The simple answer to this question would be YES. To achieve this, you need to install and setup MySQL on your computer. Once you do it, you will be able to access the MySQL database with the help of Node.js.
-
What Databases does Node.js support?
Node.js supports all kinds of databases whether it is a relational database or NoSQL Database. However, MongoDB fits best with Node.js.
-
What Is Sequelize?
Sequelize is a powerful library of JavaScript that helps you to manage the SQL database. It is basically an Object-Relational Mapper (ORM). In simple words, it helps you to map the object syntax to the database schema.
-
What Are The Benefits Of Sequelize?
The major benefits of using Sequelize are as listed below:
Support For Database Synchronization
Fast Loading
Facility For Transactions & Migrations
Ease Of Testing -
What Are The Tools Required For Building A Node.js REST CRUD API?
The following tools help you to build a Node.jS REST CRUD API:
Node.js
Express
NPM
MySQL
Sequelize
Postman

