When you have come here to read this article, it is safe to presume that you already have knowledge about the basics of building an app with React Native. Today, we will discuss React Native Push Notification in detail.
This article essentially concentrates on how you can apply push notifications for a newly developed mobile application using React Native Push Notification service.
It is not rocket science, and anyone with keen interest can craft a wonderful application using React Native Notification. In fact, React Native Performance is the best in the business.
Reports conducted by companies show that the usage and presence of push notifications boost app involvement by 88 percent.
Now, what are the possible approaches to convey push notifications to customers? It can be done locally and using a remote tool.
Setting Up React Native Push Notifications For Android
Local notifications come from a React Native application, but the remote push notifications are transmitted via a server or a notification service viz. Google’s Cloud Messaging Service.
Prerequisites
Establishing React Native Push Notifications compels you to abide by some basic prerequisites.
You ought to download and establish a few elements on your local development console, ensuring that you have admittance to the below-enlisted services.
- You must install Nodejs (>=10.x.x) with npm/yarn.
- React Native command-line Interface.
- Windows or Linux owners must be operating an Android emulator or a similarly configured device via USB.
- An Active Firebase project is necessary.
Install and Set Up react-native-push-notifications
To help developers with the configuration of React native push notifications, the library serves them to repress and consume local or remote notifications for different mobile operating systems. Start with creating a new React Native project, and then install the library.
react-native int RNnotifications

cd RNnotifications

yarn add react-native-push-notification
For Apple devices, this push notification library rests with the hand-operated installation instructions.
Developers can get guidance at PushNotificationIOS which they can get from an API maintained by the react-native-community.
Android developers have some necessary changes to make in the relevant files. These adjustments enable developers to hone their native skills.
To start with, a developer needs to visit the file titled android/build.gradle and enter the code as described below
buildscript {

   ext {

       // add the following two lines

       googlePlayServicesVersion = "16.1.0" // default: "+"

       firebaseVersion = "17.3.4" // default: "+"

   }

   repositories {

       google()

       jcenter()

   }

   dependencies {

       // add the following dependency

       classpath 'com.google.gms:google-services:4.3.2'

   }

}
Step two would be to open android/settings.gradle and append the code given below before including ‘: app’.
include ':react-native-push-notification'

project(':react-native-push-notification').projectDir = file('../node_modules/react-native-push-notification/android')
In the preceding step, you are attaching native bindings to implement the Firebase backend to address and obtain notifications without being active.
We must bring into your notice that, if you are not intending to use remote notifications, you do not need to execute the step mentioned above.
Instead, go for this particular step as it aids both types of notifications to work. Launch the android/app/src/main/AndroidManifest.xml file.
Add the <application> tag and write down this code.
<uses-permission android_name="android.permission.WAKE_LOCK" />

   <permission

       android:name="${applicationId}.permission.C2D_MESSAGE"

       android:protectionLevel="signature" />

   <uses-permission android_name="${applicationId}.permission.C2D_MESSAGE" />

   <!-- < Only if you're using GCM or localNotificationSchedule() > -->

<uses-permission android_name="android.permission.VIBRATE" />

   <uses-permission android_name="android.permission.RECEIVE_BOOT_COMPLETED"/>
These codes will permit the android app to vibrate when a new notification arrives. Within the <application> tag, make no changes and add:
<meta-data  android:name="com.dieam.reactnativepushnotification.notification_channel_name"

               android:value="YOUR NOTIFICATION CHANNEL NAME"/>

       <meta-data  android:name="com.dieam.reactnativepushnotification.notification_channel_description"

                   android:value="YOUR NOTIFICATION CHANNEL DESCRIPTION"/>

       <!-- Change the resource name to your App's accent color - or any other color you want -->

       <meta-data  android:name="com.dieam.reactnativepushnotification.notification_color"

                   android:resource="@android:color/white"/>

<!-- < Only if you're using GCM or localNotificationSchedule() > -->

       <receiver

           android:name="com.google.android.gms.gcm.GcmReceiver"

           android:exported="true"

           android:permission="com.google.android.c2dm.permission.SEND" >

           <intent-filter>

               <action android_name="com.google.android.c2dm.intent.RECEIVE" />

               <category android_name="${applicationId}" />

           </intent-filter>

       </receiver>

       <!-- < Only if you're using GCM or localNotificationSchedule() > -->

<receiver android_name="com.dieam.reactnativepushnotification.modules.RNPushNotificationPublisher" />

       <receiver android_name="com.dieam.reactnativepushnotification.modules.RNPushNotificationBootEventReceiver">

           <intent-filter>

               <action android_name="android.intent.action.BOOT_COMPLETED" />

           </intent-filter>

       </receiver>

       <service android_name="com.dieam.reactnativepushnotification.modules.RNPushNotificationRegistrationService"/>

<!-- < Only if you're using GCM or localNotificationSchedule() > -->

       <service

           android:name="com.dieam.reactnativepushnotification.modules.RNPushNotificationListenerServiceGcm"

           android:exported="false" >

           <intent-filter>

               <action android_name="com.google.android.c2dm.intent.RECEIVE" />

           </intent-filter>

       </service>

       <!-- </ Only if you're using GCM or localNotificationSchedule() > -->

<!-- < Else > -->

       <service

           android:name="com.dieam.reactnativepushnotification.modules.RNPushNotificationListenerService"

           android:exported="false" >

           <intent-filter>

               <action android_name="com.google.firebase.MESSAGING_EVENT" />

           </intent-filter>

       </service>
Finally, continue to android/app/src/res/values/colors.xml. Create a new file if you get a file-not-found error. With this file, you can set the notification blinking light colour of your Android device.
An example of a white notification light is given below.
<resources>

<color name=”white”>#FFF</color>

</resources>
Ways to Configure Local Push Notifications
Are you wondering where you can learn to configure local React Native Push Notification Android? Read along.
Start by creating a new file src/services/LocalPushController.js. Import PushNotification from the library.
import PushNotification from 'react-native-push-notification'
Annexe PushNotification.configure() to the data. The file allows the target with an essential method termed onNotification. Being a necessary method, it is summoned during a local or remote notification.
The default application only summons a console statement mentioning the characteristics of the local notification object that the developers have deployed in the demonstration application.
PushNotification.configure({

 // (required) Called when a remote or local notification is opened or received

 onNotification: function(notification) {

   console.log('LOCAL NOTIFICATION ==>', notification)

 },

popInitialNotification: true,

 requestPermissions: true

})
Once that is done, we need to export LocalNotification in the fragment so that it is called for action when we press a knob termed onPress attribute.
export const LocalNotification = () => {

 PushNotification.localNotification({

   autoCancel: true,

   bigText:

     'This is local notification demo in React Native app. Only shown, when expanded.',

   subText: 'Local Notification Demo',

   title: 'Local Notification Title',

   message: 'Expand me to see more',

   vibrate: true,

   vibration: 300,

   playSound: true,

   soundName: 'default',

   actions: '["Yes", "No"]'

 })

}
push notification.localNotification has an abundance of characteristics for several mobile operating systems. You can customize properties like vibration, biggest, subText specific to Android.
Note that features such as actions, title, message, playSound, & soundName can be built on any platform.
Introduce the aforementioned method in the App.js file.
Compute the LocalNotification from the src/services/LocalPushController.js file. The subsequent step would be to supplement a handler method handleButtonPress to the functional App segment. It is called to action when the knob is pressed.
import React from 'react'

import { Text, View, Button, StyleSheet } from 'react-native'

import { LocalNotification } from './src/services/LocalPushController'

const App = () => {

 const handleButtonPress = () => {

   LocalNotification()

 }

return (

   <View style={styles.container}>

     <Text>Press a button to trigger the notification</Text>

     <View style={{ marginTop: 20 }}>

       <Button title={'Local Push Notification'} onPress={handleButtonPress} />

     </View>

   </View>

 )

}

const styles = StyleSheet.create({

 container: {

   flex: 1,

   justifyContent: 'center',

   alignItems: 'center'

 },

 buttonContainer: {

   marginTop: 20

 }

})

export default App
Last, but not the least, from a concluding window, run react-native run-android. For execution, a device needs to be joined via USB with active USB debugging.
The output of the above code should look like this:
Ways To Configure Remote Push Notifications
Not just adding codes, but examining and testing their performance is also necessary. Start with integrating the Cloud Messaging Service using Firebase.
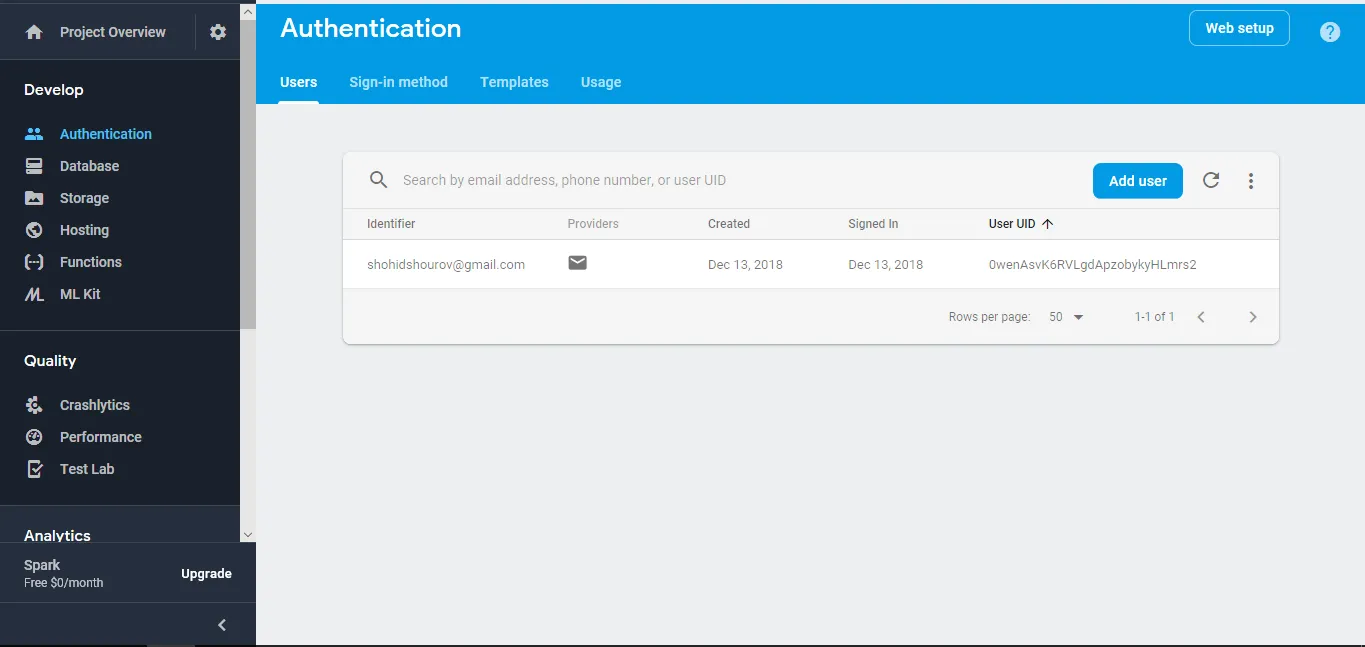
Open an active Firebase project from the main Dashboard page, and click on Project Settings. Hover to the Your apps section, select Add app, then set up a new Android app.
Register the application after this step.
You have to download the file google-services.json and store it at the path android/app/ within the React Native project.
Launch the path android/app/build.gradle file and write the following code.
dependencies {

   implementation project(':react-native-push-notification')

   // ... rest remains same

}

// at the end of the file, add

apply plugin: 'com.google.gms.google-services'
Developers should generate a new service file called RemotePushController.js within the path src/services/ directory. This file comprises all the arrangements needed to manage a remote push notification in react native.
An obligatory Android property called senderID is elicited from Project Settings > Cloud Messaging.

import React, { useEffect } from 'react'

import PushNotification from 'react-native-push-notification'

const RemotePushController = () => {

 useEffect(() => {

   PushNotification.configure({

     // (optional) Called when Token is generated (iOS and Android)

     onRegister: function(token) {

       console.log('TOKEN:', token)

     },

// (required) Called when a remote or local notification is opened or received

     onNotification: function(notification) {

       console.log('REMOTE NOTIFICATION ==>', notification)

// process the notification here

     },

     // Android only: GCM or FCM Sender ID

     senderID: '256218572662',

     popInitialNotification: true,

     requestPermissions: true

   })

 }, [])

return null

}

export default RemotePushController
The Cloud Messaging setting functions with the application of a Token connecting the app and the notification service. The on Register function records the remote server and sustains that token.
We administer the controller segment to get a null output and bypass any effect on the ultimate layout.
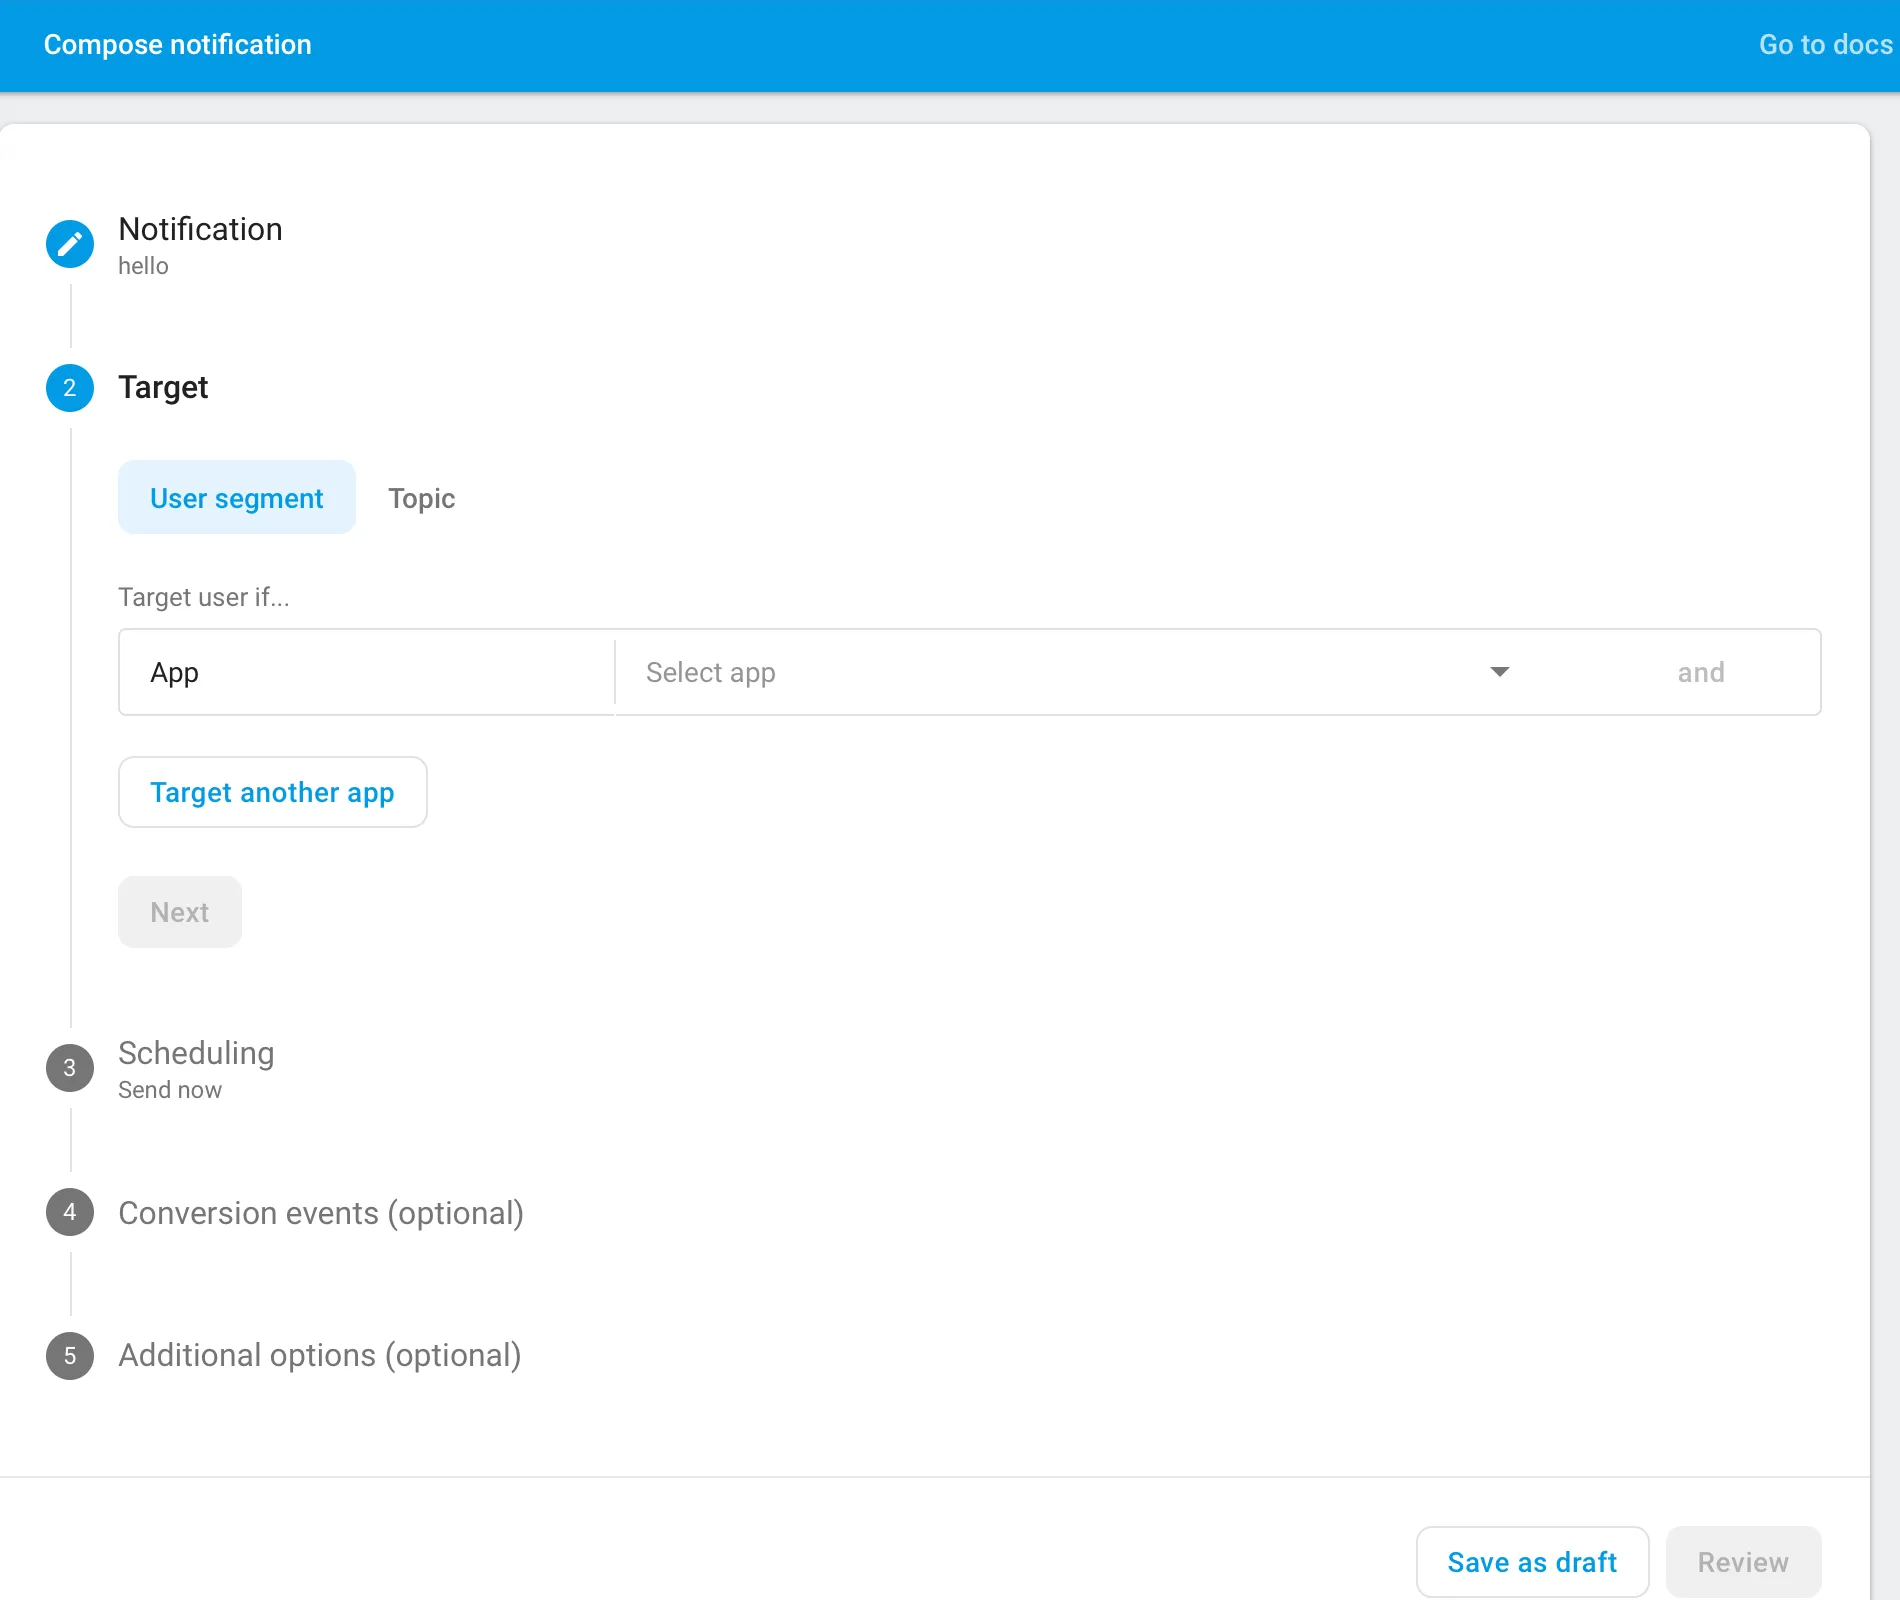
To test this, a user needs to visit the Cloud Messaging division and formulate a notification.
Hit on the Send test message key and review for the desired output.
The user can make personalized changes to the title, text, body, messages, and other performance of the Firebase Cloud Messaging service to broadcast notifications on a circumstantial time and day.
Setting Up React Native Push Notifications For Android & iOS Using Pubnub
Prerequisites
What are the must-haves for using this utility?
- For developing in the Apple software the code must be built on macOS.
- Users have to subscribe with a fee to /Apple Developer Program.
- The developer needs to have a PubNub membership. Unique PubNub keys are available for users who log in with their PubNub account details from the PubNub Admin Dashboard.
Install React Native
No matter which smart device you are using, there is a sequential process to install React native. The following two steps will help a user install the RN.
1. Firstly, the user should have the Node and Watchman on the machine using Homebrew.
brew install node

brew install watchman
2. Next possession should be React Native CLI.
npm install -g react-native-cli
How to Setup for iOS

Configuring notification services for iOS environments using React necessitates a user to follow these steps:
1. Xcode should be present in the machine. It is available in the Mac App Store. It also installs the iOS Simulator which packs the inevitable tools for app building.
2. Follow it up with Xcode Command Line Tools installation. Initiate Xcode and pick “Preferences…” when you sight it in the Xcode menu. Navigate to the panel termed Locations. Select the updated version of tools from the CLI dropdown and install it.
Notifications Setup for Android
Similar to the above process, but with minor differences, the installation for Android is like this.
Things to have in the machine:
- Java SE Development Kit
- Android Studio
- Android Marshmallow 6.0
Inside the study look for a “Custom” to pick an installation variety and tick these options:
- Android SDK
- Android SDK Platform
- Performance (Intel ® HAXM)
- Android Virtual Device
Enter Android Studio to select “Configure” -> pick “SDK Manager” -> Navigate to “SDK Platforms” bar and tick “Show Package Details” -> complete the following changes.
The additional system requisites are:
- Google APIs
- Android SDK Platform 23
- Intel x86 Atom_64 System Image
- Google APIs Intel x86 Atom_64 System Image
The subsequent configuration in the form of a flowsheet needs to be employed.
Tap “SDK Tools” window->tick “Show Package Details”->view the choices for “Android SDK Build-Tools”-> elect “23.0.1” -> “Apply”.
Perform the commands as mentioned:
Edit the .bash_profile typing the command nano $HOME/.bash_profile.-> Paste these entries in your .bash_profile
import React, { useEffect } from 'react'

import PushNotification from 'react-native-push-notification'

const RemotePushController = () => {

 useEffect(() => {

   PushNotification.configure({

     // (optional) Called when Token is generated (iOS and Android)

     onRegister: function(token) {

       console.log('TOKEN:', token)

     },

// (required) Called when a remote or local notification is opened or received

     onNotification: function(notification) {

       console.log('REMOTE NOTIFICATION ==>', notification)

// process the notification here

     },

     // Android only: GCM or FCM Sender ID

     senderID: '256218572662',

     popInitialNotification: true,

     requestPermissions: true

   })

 }, [])

return null

}

export default RemotePushController
Run and process the configuration changes.
How To Create A New React App
These are the codes you need to craft a new React Native project called “PushApp”:
react-native init PushApp
Get Started Using PubNub
Open a new PubNub account->Create a unique app in the PubNub Admin Dashboard->Pick the app and generate a new keyset->Record the Publish Key as well as the Subscribe Key for future use.
Integrating Push Notifications
Get hands on the React Native Push Notifications library to blend push notifications. The code below describes the integration process.
npm install --save react-native-push-notification
react-native link
Integrate iOS Push Notifications
1. Open the Xcode in the “iOS” directory of the app project.
2. Sign into Xcode with an apple ID.
3. Navigate to the general settings
4. Setting up the bundle identifier to a unique string.
5. Navigate back to general settings and manually link PushNotificationsIOS library.
// Required to register for notifications
- (void)application:(UIApplication *)application didRegisterUserNotificationSettings:(UIUserNotificationSettings *)notificationSettings
{
[RCTPushNotificationManager didRegisterUserNotificationSettings:notificationSettings];
}
// Required for the register event.
- (void)application:(UIApplication *)application didRegisterForRemoteNotificationsWithDeviceToken:(NSData *)deviceToken
{
[RCTPushNotificationManager didRegisterForRemoteNotificationsWithDeviceToken:deviceToken];
}
// Required for the notification event. You must call the completion handler after handling the remote notification.
- (void)application:(UIApplication *)application didReceiveRemoteNotification:(NSDictionary *)userInfo
fetchCompletionHandler:(void (^)(UIBackgroundFetchResult))completionHandler
{
[RCTPushNotificationManager didReceiveRemoteNotification:userInfo fetchCompletionHandler:completionHandler];
}
// Required for the registrationError event.
- (void)application:(UIApplication *)application didFailToRegisterForRemoteNotificationsWithError:(NSError *)error
{
[RCTPushNotificationManager didFailToRegisterForRemoteNotificationsWithError:error];
}
// Required for the localNotification event.
- (void)application:(UIApplication *)application didReceiveLocalNotification:(UILocalNotification *)notification
{
[RCTPushNotificationManager didReceiveLocalNotification:notification];
Now go to Apple Developer Portal and complete the other formalities. Download your Key ID and also get your Team ID.
Go to your PubNub Admin Dashboard, select your app, and then select your keyset. Enter Key ID & Team ID. You’re good to go now.
Implement Push Notification in Android
Add permissions at the top of “android/app/src/main/AndroidManifest.xml”.
<uses-permission android_name="android.permission.WAKE_LOCK"/>
<permission
android_name="${applicationId}.permission.C2D_MESSAGE"
android_protectionLevel="signature" />
<uses-permission android_name="${applicationId}.permission.C2D_MESSAGE"/>
<uses-permission android_name="android.permission.VIBRATE"/>
<uses-permission android_name="android.permission.RECEIVE_BOOT_COMPLETED"/>
Add configuration in “android/app/src/main/AndroidManifest.xml”
<receiver android_name="com.dieam.reactnativepushnotification.modules.RNPushNotificationPublisher"/>
<receiver android_name="com.dieam.reactnativepushnotification.modules.RNPushNotificationBootEventReceiver">
<intent-filter>
<action android_name="android.intent.action.BOOT_COMPLETED" />
</intent-filter>
</receiver>
<service android_name="com.dieam.reactnativepushnotification.modules.RNPushNotificationRegistrationService"/>
<service
android_name="com.dieam.reactnativepushnotification.modules.RNPushNotificationListenerService"
android_exported="false" >
<intent-filter>
<action android_name="com.google.firebase.MESSAGING_EVENT" />
</intent-filter>
</service>
Now, move to the firebase console and register the app. You will find a unique package name for the app. This is an exact answer to How to Use Push Notification in Android.
Go to your PubNub Admin Dashboard, select your app, and then select your keyset. Now, add the API Key that you generated at the time of registration.
You’re good to go now.!
Get A Device Token
The steps necessary to get a device token are as follows:
->Import PubNub and push notifications in “App.js”.
import PushNotificationIOS from 'react-native';
import PubNubReact from 'pubnub-react';
var PushNotification = require('react-native-push-notification');
->Add the constructor within the App segment and before the method render().
constructor(props) {
super(props);
pubnub = new PubNubReact({
publishKey: 'YOUR_PUBNUB_PUBLISH_KEY_HERE',
subscribeKey: 'YOUR_PUBNUB_SUBSCRIBE_KEY_HERE'
});
pubnub.init(this);
configure({
// Called when Token is generated.
onRegister: function(token) {
log( 'TOKEN:', token );
if (token.os == "ios") {
pubnub.push.addChannels(
{
channels: ['notifications'],
device: token.token,
pushGateway: 'apns'
});
// Send iOS Notification from debug console: {"pn_apns":{"aps":{"alert":"Hello World."}}}
} else if (token.os == "android"){
pubnub.push.addChannels(
{
channels: ['notifications'],
device: token.token,
pushGateway: 'gcm' // apns, gcm, mpns
});
// Send Android Notification from debug console: {"pn_gcm":{"data":{"message":"Hello World."}}}
}
}.bind(this),
// Something not working?
// See: https://support.pubnub.com/support/solutions/articles/14000043605-how-can-i-troubleshoot-my-push-notification-issues-
// Called when a remote or local notification is opened or received.
onNotification: function(notification) {
log( 'NOTIFICATION:', notification );
// Do something with the notification.
// Required on iOS only (see fetchCompletionHandler docs: https://reactnative.dev/docs/pushnotificationios)
// notification.finish(PushNotificationIOS.FetchResult.NoData);
},
// ANDROID: GCM or FCM Sender ID
senderID: "sender-id",
});
}
->Obtain novel PubNub keys from your PubNub Admin Dashboard->Replace “YOUR_PUBNUB_PUBLISH_KEY_HERE” and
“YOUR_PUBNUB_SUBSCRIBE_KEY_HERE” with the Publish Key and Subscribe Key->Substitute “sender-id” with the Sender ID received beforehand from the firebase console.
Gear up with this app to receive push notifications.
Build An App & Test Push Notification
After building the app and before deploying it, the app needs proper testing of its notification functionalities.
This testing phase is unavoidable and applicable for both Android and iOS devices. Developers can take help of the web version of the guide for testing the notification service in a mobile simulator.
Sending Push Notifications
How can you send and broadcast push notifications? With PubNub you can promulgate a message to the course or channels with which you have paired your devices.
No subscription of the devices is necessary to initiate notifications for a particular channel.
Registration is only mandatory for push notifications where there is a push notification key for the device available.
- Related APNS equipment will accommodate solely the data inside the pn_apns key.
- Auxiliary GCM/FCM tools will collect exclusively the data inside the pn_gcm key.
- Innate PubNub subscribers will experience the undivided object literal, together with the pn_apns and pn_gcm keys.
The most straightforward approach to assess push notifications is to convey them through the PubNub Debug Console inside the PubNub Admin Dashboard.
Testing Push Notifications With PubNub
The following flow text describes the way users test notification with Pubnub
Firstly visit PubNub Admin Dashboard->choose the built app->confirm the keyset to use->select “Debug Console”->form a client with “Default Channel” fixed to notifications.
With this newly furnished client, users can transmit a notification to the mobile by broadcasting code {“pn_apns”:{“aps”:{“alert”:”Hello World.”}}} to the pn_apns or pn_gcm keys.
Architecture Of Push Notification

Before we jump into the details of push notification architecture, let us learn a few basic things. Apple for iOS provides the Apple Push Notification service, and Google for Android provides the Firebase Cloud Messaging notification services respectively.
If a developer intends to employ these services, he or she needs to designate the app for APNs or FCM. Subsequently achieving the registration, the developer initiates a license with Server API Key for FCM that saves inside the information provider.
An example of a notification provider is AWS SNS. Developers can intensify push information features using FCM, build the algorithm on their own, and make it a division of the backend operation.
The objective of Apple Push Notification and Firebase Cloud Messaging services is to empower users to broadcast a push notification to a user.
While sending such notifications, it is totally inessential to distinguish the IP number of the user’s machine.
The alert reaches the user without any other requirement and only some coding into your app is necessary so that the developer can designate the user’s device with APNs or FCM.
After configuring everything successfully, an information alert for the assigned device token is sent to the user.
This token is generated from no other place than the backend system via notification contributors to APNs or FCM, and they deliver them to the user’s device.
Types Of Notifications
The following section describes the types of React Native Push Notifications.
Foreground vs Background
- Foreground notification is what we term to the alert received by the user when the app is launched and operational.
- Background notifications display during a time when the user either operates the app in the backdrop or has terminated the app altogether.
With diverse varieties of notifications, there are copious functions and APIs used to manage notifications concerning the status of the app on the user’s machine.
Remote vs Local
There is a stark contrast if you analyze between a local and remote notification. The former is inducted from inside the application and then released to the system notification core within a provided time frame on repetition. Local notifications are not transmitted from the server.
On the contrary, a remote notification is emitted from a server.
Conclusion
You can hire react native developers so that they will create customized notification features for your device with the knowledge that you have gathered from here.
Come back to learn about more enlightening topics on React Native Push Notification.
We hope you had a great experience reading this article and it proves to be of great value for any React Native Development Company in the near future. Thank You.!

